As the leaves change colors and the air turns crisp, it’s the perfect time to refresh your manicure with some fabulous fall-themed nails. Whether you’re into intricate designs or prefer something more simple and chic, I’ve got you covered. Let’s dive into some stunning nail art ideas that will make your nails the star of the season.
Vibrant Leafy Greens
Fall is synonymous with the vibrant hues of nature, and this leafy green design captures that essence beautifully. The combination of deep greens with pops of yellow, orange, and red creates a stunning, almost stained-glass effect. Each nail features a unique pattern, making it a true work of art.

- Deep green polish (e.g., OPI Lincoln Park After Dark)
- Yellow polish (e.g., Essie Fall For NYC)
- Orange polish (e.g., China Glaze Orange You Hot?)
- Red polish (e.g., Zoya Elisa)
- Fine detail brush
- Top coat (e.g., Seche Vite Dry Fast Top Coat)
Instructions:
- Start with a base coat to protect your nails.
- Apply a deep green polish as the base color.
- Using a fine detail brush, draw leaf patterns with the yellow, orange, and red polishes.
- Seal your design with a top coat for a glossy finish and extra durability.
Pumpkin Spice & Everything Nice
Pumpkin season is here, and what better way to celebrate than with these adorable pumpkin-themed nails? This design combines matte orange nails with glittery gold accents and detailed pumpkin artwork, perfect for those who love a bit of sparkle.
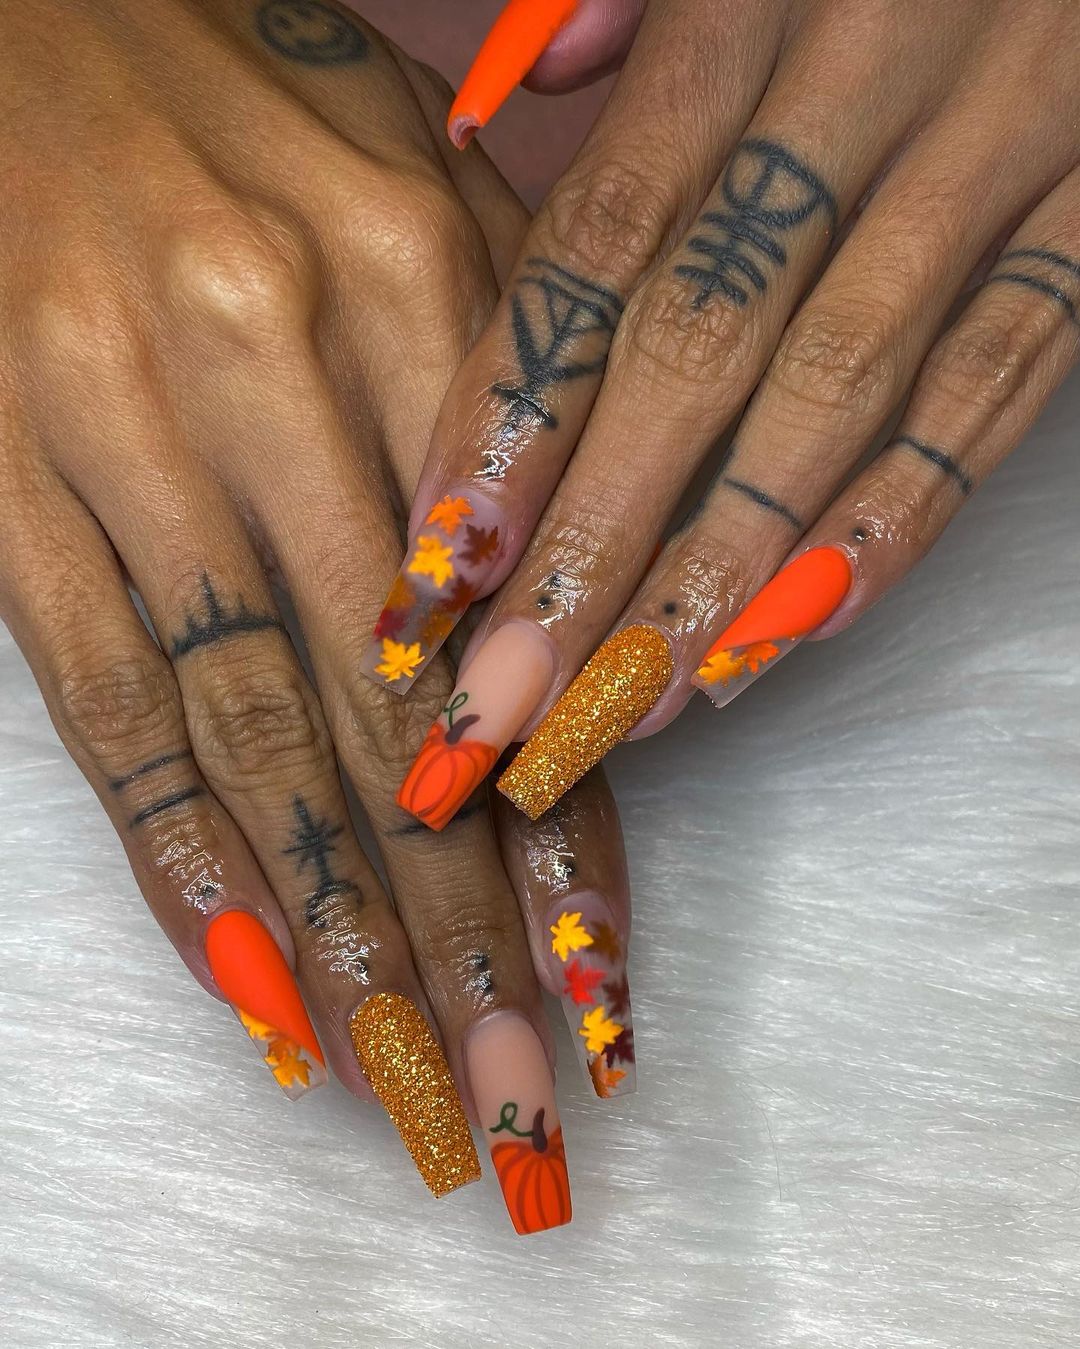
- Matte orange polish (e.g., Sally Hansen Miracle Gel in Electri-Cute)
- Gold glitter polish (e.g., Essie Summit of Style)
- Black polish for detailing (e.g., OPI Black Onyx)
- Fine detail brush
- Matte top coat (e.g., OPI Matte Top Coat)
Instructions:
- Apply a base coat to your nails.
- Paint your nails with the matte orange polish.
- Use the gold glitter polish to create accent nails.
- Draw pumpkin designs on a few nails using the black polish and a fine detail brush.
- Finish with a matte top coat to seal the look.
Floral Fantasies in Coral
For those who prefer a softer look, this floral design in coral and pastel shades is perfect. The delicate flowers and leaves against a peachy-coral background give off a fresh, yet autumnal vibe, ideal for both everyday wear and special occasions.
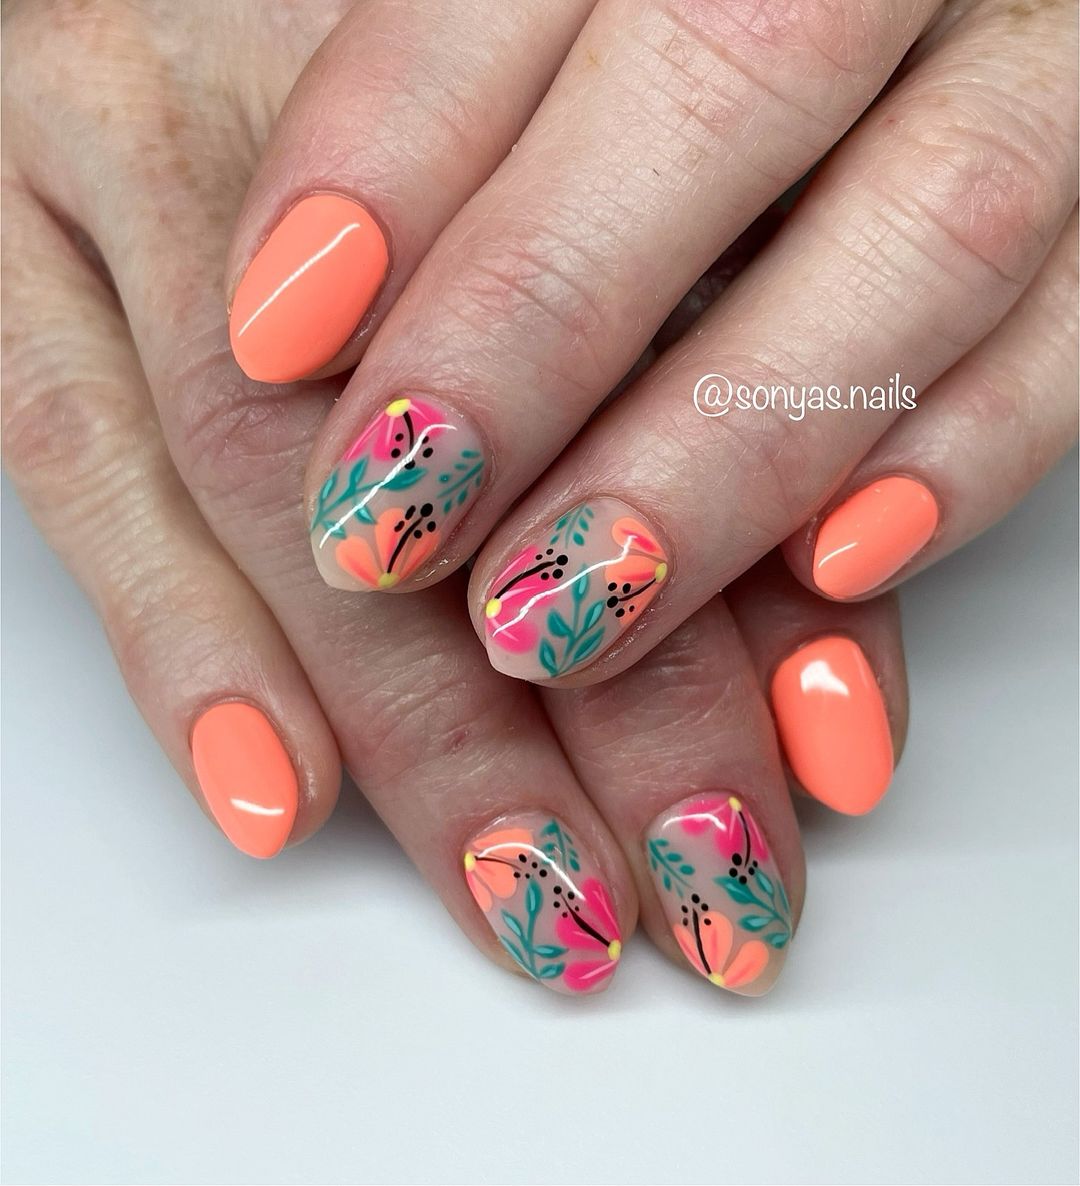
- Coral polish (e.g., Essie Tart Deco)
- Pastel shades for flowers (e.g., Essie Mint Candy Apple, Essie Lilacism)
- Black polish for detailing (e.g., OPI Black Onyx)
- Fine detail brush
- Top coat (e.g., Seche Vite Dry Fast Top Coat)
Instructions:
- Begin with a base coat.
- Apply the coral polish as the base color.
- Using a fine detail brush, paint flowers and leaves with the pastel shades.
- Outline the flowers and add details with the black polish.
- Seal with a top coat to protect your design.
Bold and Fiery Red
This bold red design is perfect for those who want to make a statement this fall. The striking combination of red and black on stiletto-shaped nails creates a fierce and edgy look. The gradient effect from nude to vibrant red, accented by sharp black lines, adds depth and dimension to the design, making it stand out.
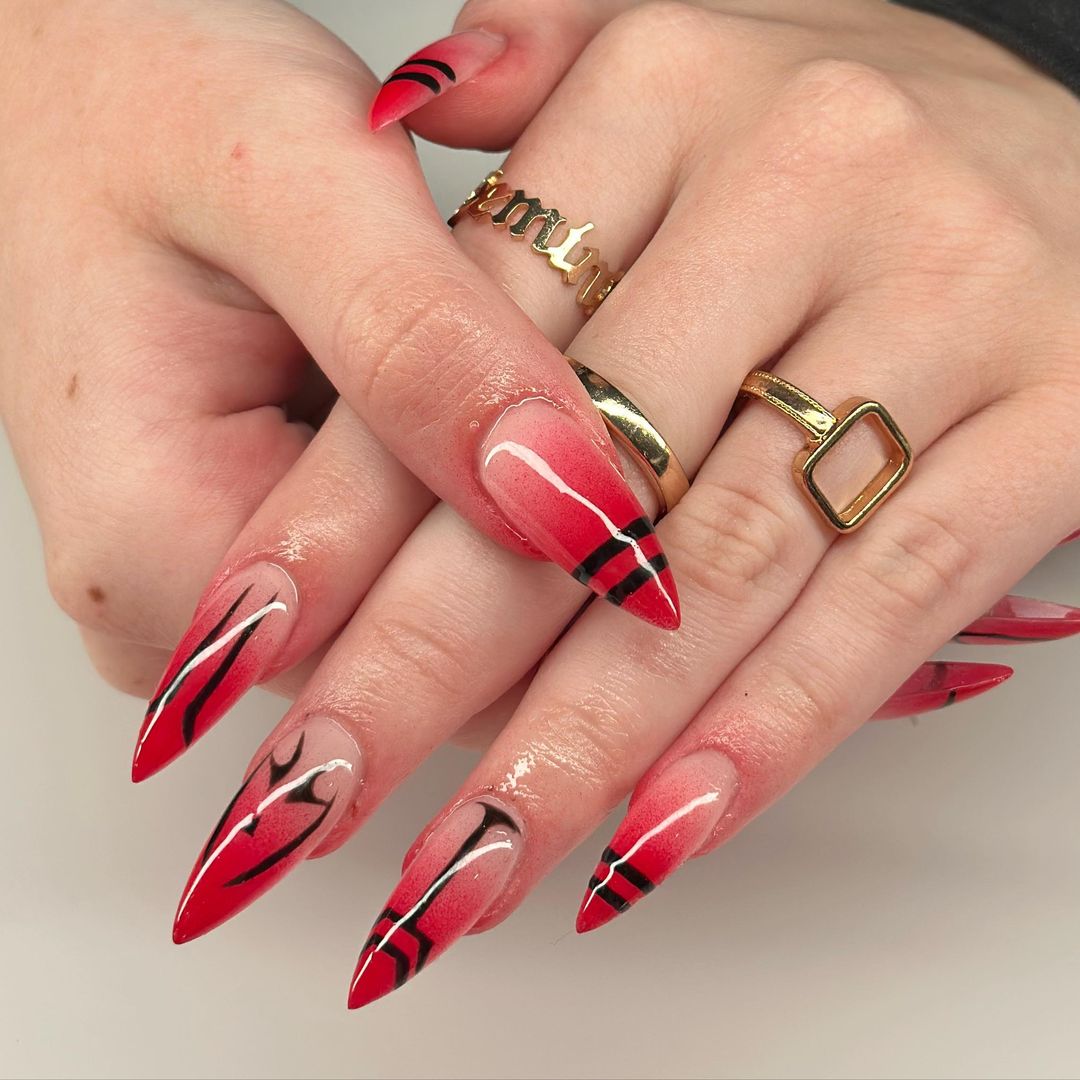
- Nude base polish (e.g., OPI Bubble Bath)
- Red polish (e.g., Essie Really Red)
- Black polish (e.g., OPI Black Onyx)
- Fine detail brush
- Top coat (e.g., Seche Vite Dry Fast Top Coat)
Instructions:
- Apply a base coat to your nails.
- Start with the nude base polish and let it dry.
- Create a gradient effect by sponging the red polish from the tips toward the middle.
- Use a fine detail brush to draw sharp black lines for the edgy accents.
- Finish with a top coat to add shine and protect the design.
Save Pin
Minty Fresh Texture
This unique design features a refreshing mint color combined with intricate textural details. The nails have an elongated coffin shape with an ombre effect transitioning from a nude base to a mint green. The added texture on the mint part of the nails gives a 3D effect, making this design truly stand out.
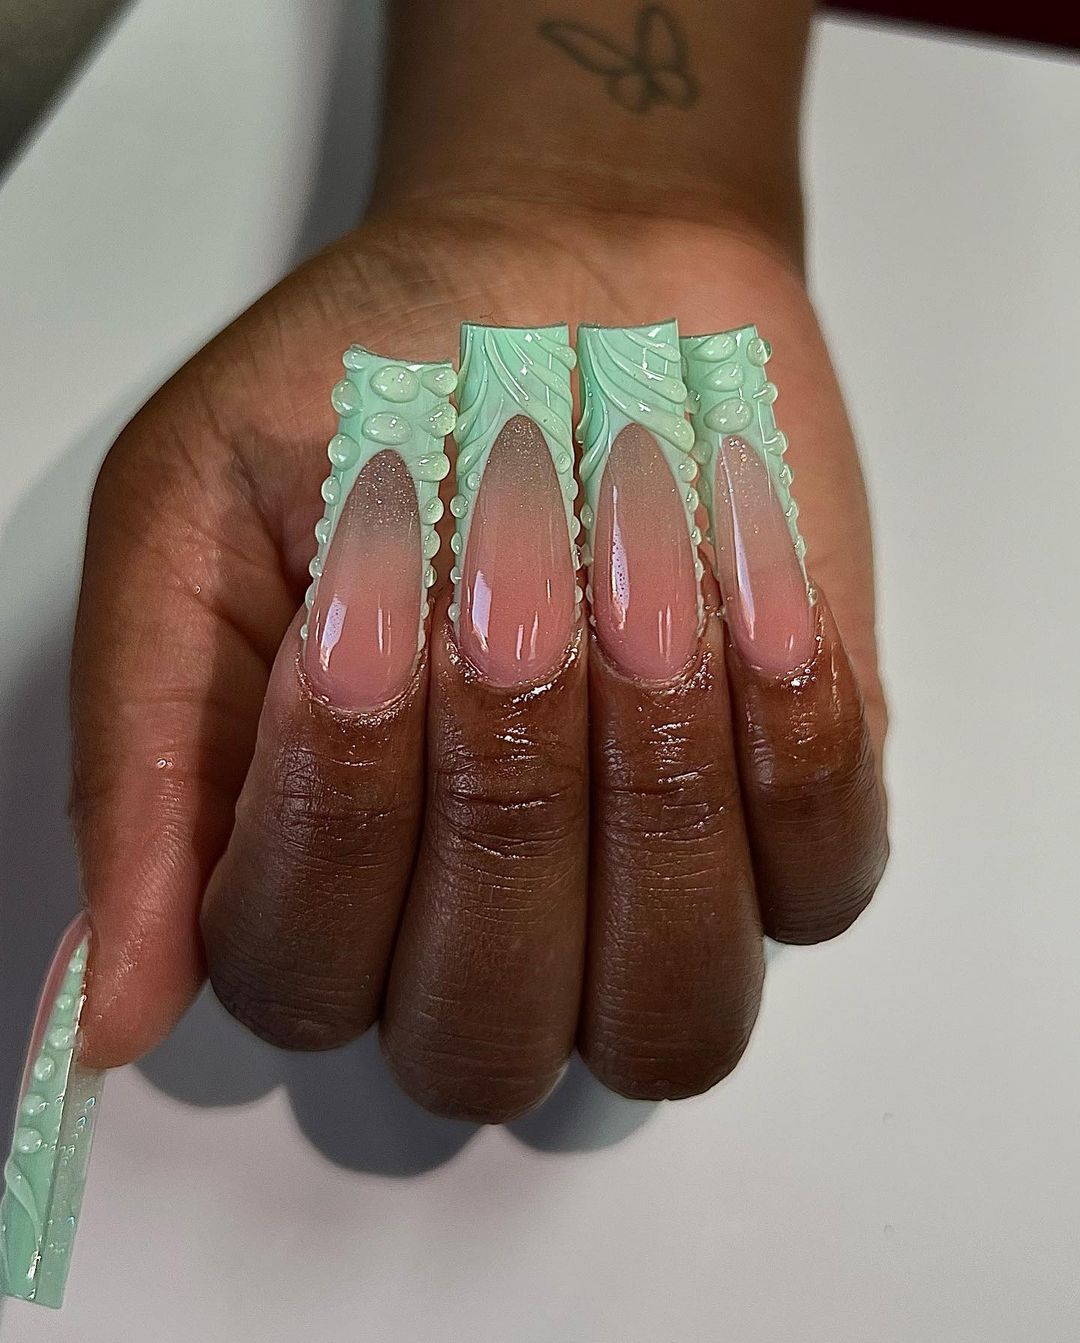
- Nude base polish (e.g., Essie Ballet Slippers)
- Mint green polish (e.g., Essie Mint Candy Apple)
- Fine detail brush
- Top coat (e.g., Seche Vite Dry Fast Top Coat)
- Texturing tool (e.g., dotting tool or toothpick)
Instructions:
- Apply a base coat to your nails.
- Paint the nails with the nude base polish and let it dry.
- Create an ombre effect by sponging the mint green polish from the tips toward the middle.
- Use the texturing tool to create the 3D effects on the mint part of the nails.
- Seal with a top coat to add shine and protect the design.
Cozy Autumn Patterns
This nail design is a delightful mix of autumn-inspired patterns and colors. The almond-shaped nails feature a variety of designs, including plaid, floral, and animal prints, all in warm autumn colors like brown, orange, and cream. This eclectic mix perfectly captures the cozy and vibrant spirit of fall.
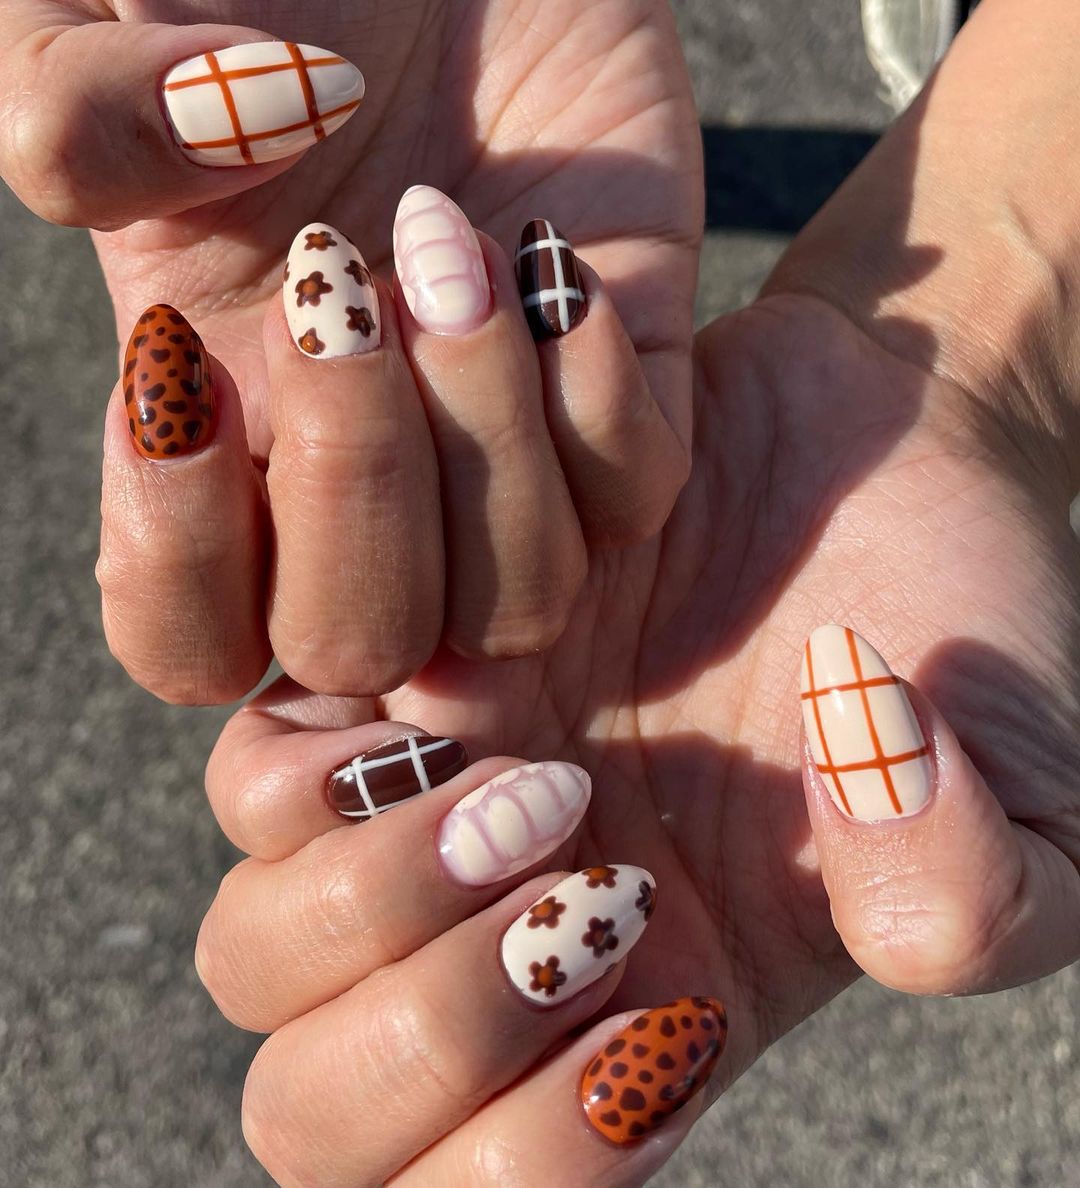
- Cream base polish (e.g., OPI Be There in a Prosecco)
- Brown polish (e.g., Essie Partner in Crime)
- Orange polish (e.g., Essie Fall For NYC)
- Fine detail brush
- Top coat (e.g., Seche Vite Dry Fast Top Coat)
Instructions:
- Start with a base coat to protect your nails.
- Apply the cream base polish and let it dry.
- Using the fine detail brush, create various patterns on each nail with the brown and orange polishes. This can include plaid lines, floral motifs, and animal prints.
- Finish with a top coat to ensure the designs are sealed and add a glossy finish.
Rustic Autumn Leaves
This nail design captures the essence of autumn with its warm, rustic tones and intricate leaf patterns. The combination of matte brown and muted teal creates a cozy and sophisticated look, perfect for the fall season. The detailed leaf designs on accent nails add a touch of nature-inspired elegance, making this manicure ideal for those who appreciate subtle yet artistic nails.
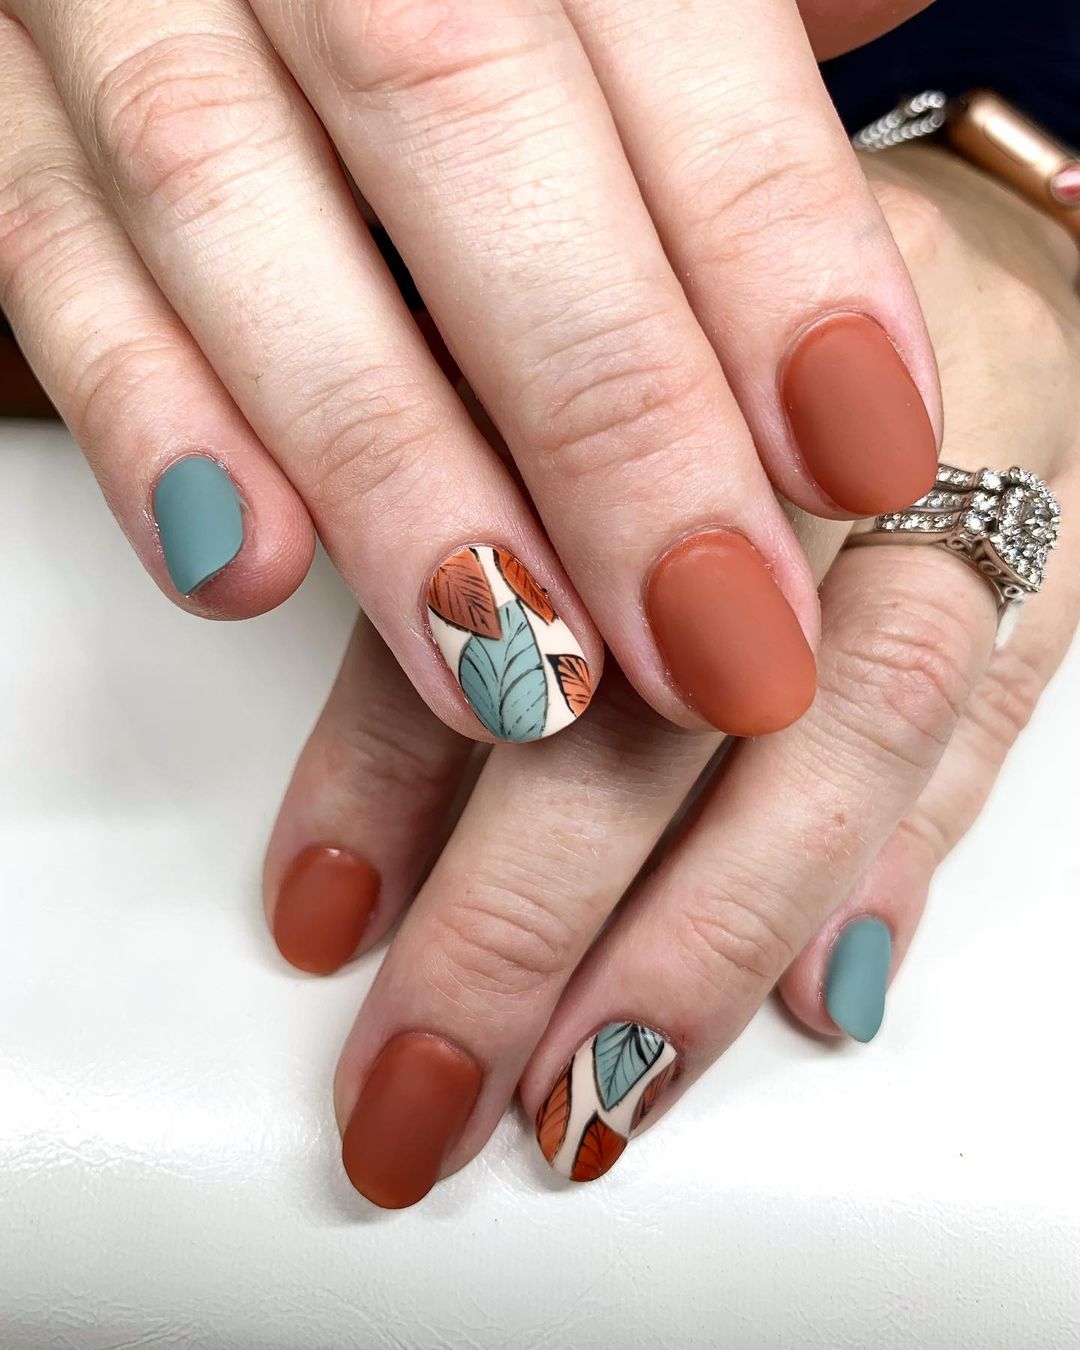
- Matte brown polish (e.g., OPI Matte Top Coat over Essie Playing Koi)
- Muted teal polish (e.g., Essie Sage You Love Me)
- Nude base polish (e.g., OPI Bubble Bath)
- Fine detail brush
- Top coat (e.g., Seche Vite Dry Fast Top Coat)
Instructions:
- Apply a base coat to your nails.
- Paint most nails with the matte brown polish, leaving one or two nails for the leaf designs.
- Use the muted teal polish on the remaining nails.
- On the accent nails, apply the nude base polish and let it dry.
- With a fine detail brush, draw leaf patterns using the brown and teal polishes.
- Seal with a top coat to protect the design.
Modern Minimalist
This modern minimalist nail design features a neutral palette with abstract shapes and clean lines. The combination of matte olive green and creamy white nails, accented with simple geometric patterns, creates a chic and sophisticated look. This design is perfect for those who prefer a subtle yet stylish manicure that can easily complement any outfit.
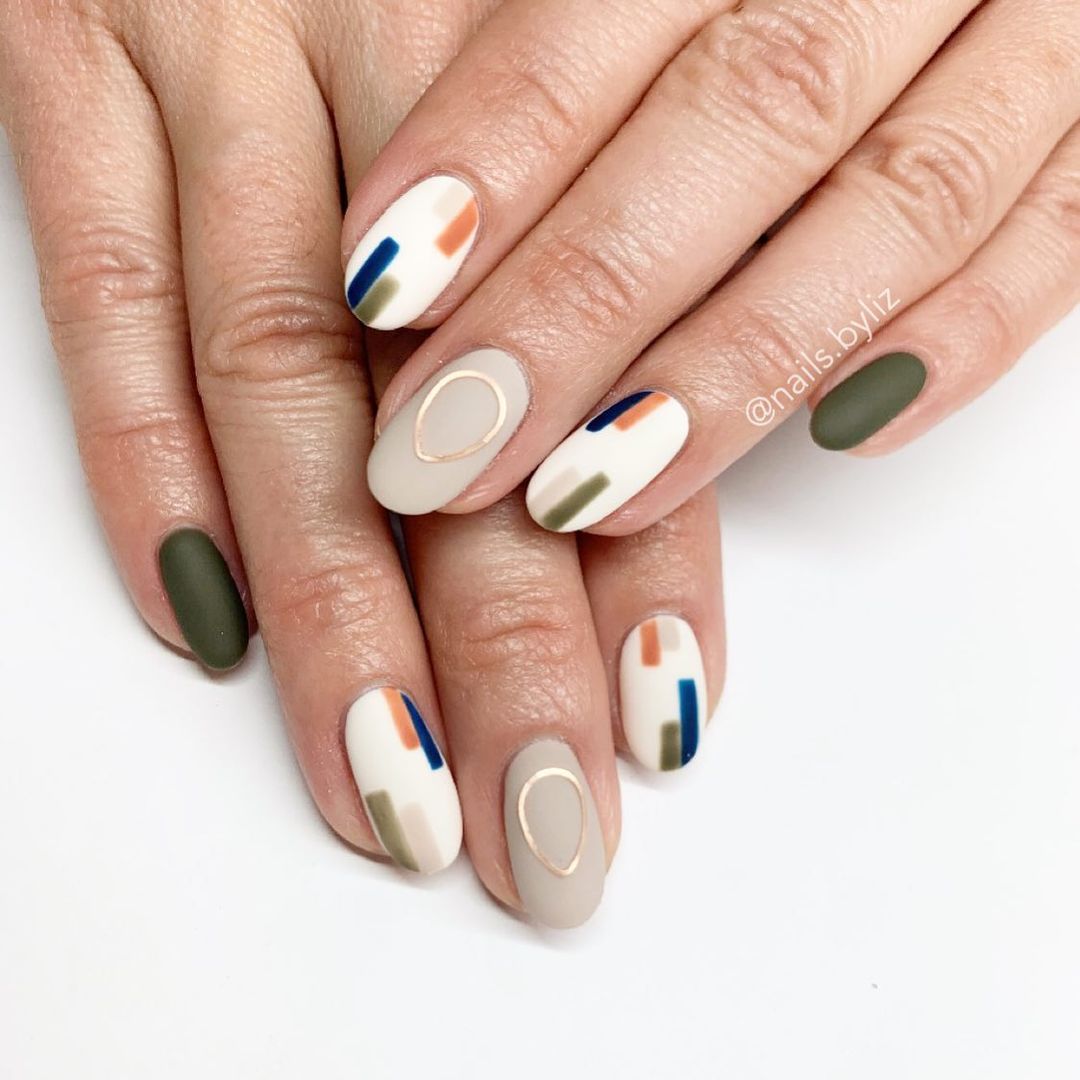
- Matte olive green polish (e.g., OPI Olive for Green)
- Creamy white polish (e.g., Essie Blanc)
- Nude base polish (e.g., OPI Samoan Sand)
- Fine detail brush
- Top coat (e.g., Seche Vite Dry Fast Top Coat)
Instructions:
- Apply a base coat to your nails.
- Paint most nails with the creamy white polish, leaving one or two nails for the geometric designs.
- Use the olive green polish on the remaining nails.
- On the accent nails, apply the nude base polish and let it dry.
- With a fine detail brush, create geometric patterns using the olive green polish.
- Seal with a top coat to protect the design.
Regal Burgundy Elegance
This luxurious nail design showcases a deep burgundy color with gold foil accents, creating a rich and elegant look. The glossy finish of the burgundy polish paired with the shimmering gold foil adds a touch of sophistication and glamour, perfect for special occasions or a night out.
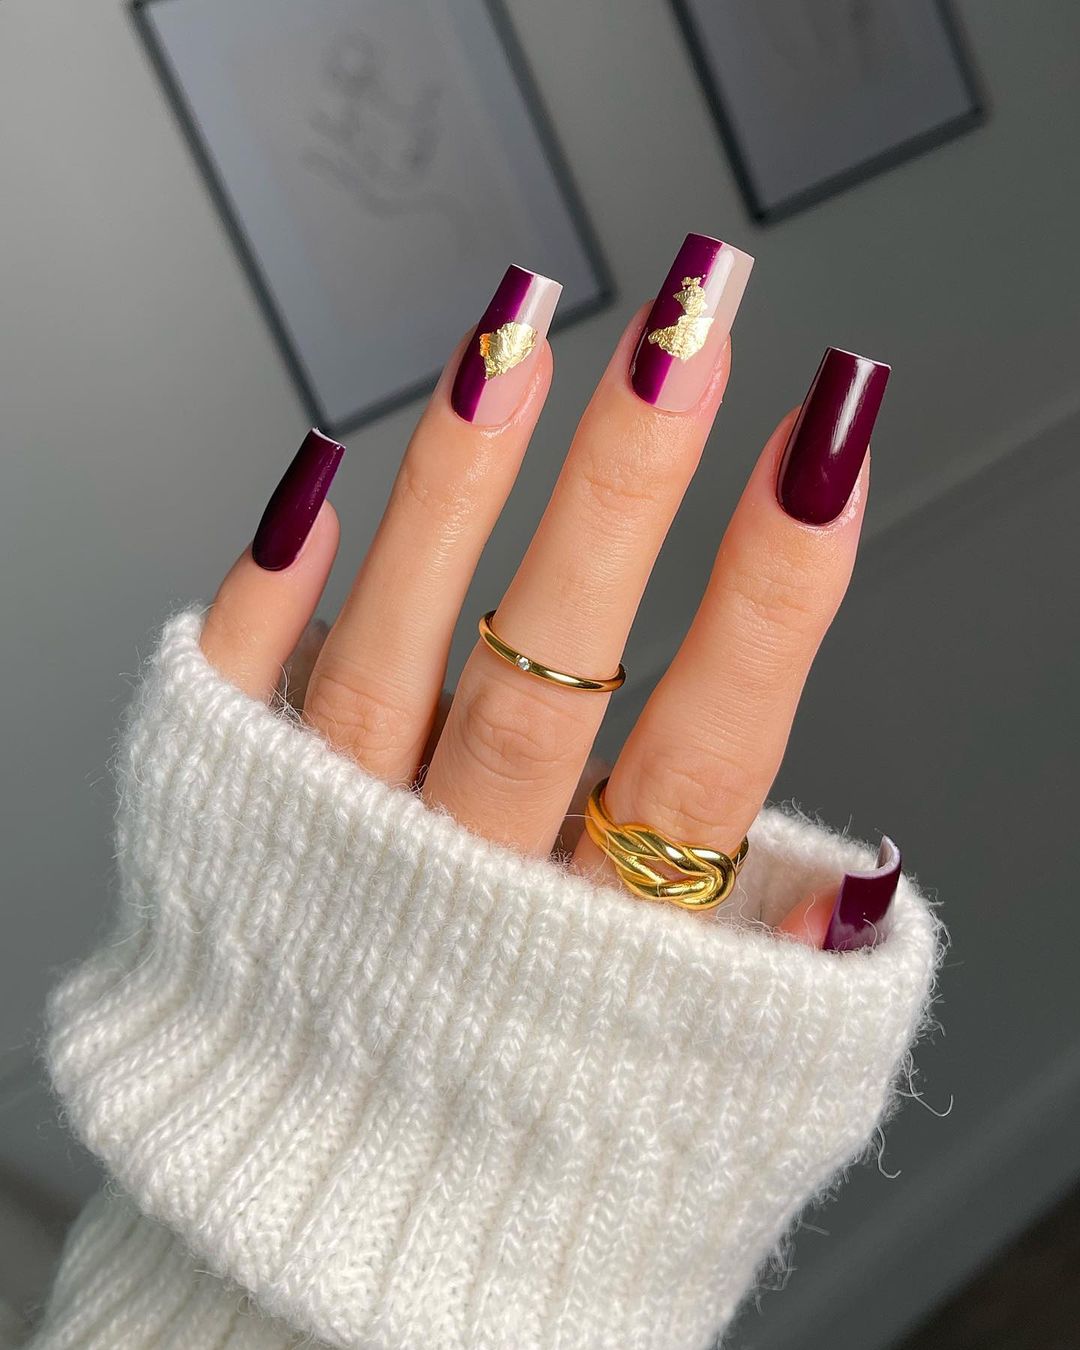
- Deep burgundy polish (e.g., Essie Bordeaux)
- Gold foil flakes (e.g., Born Pretty Gold Foil)
- Nude base polish (e.g., OPI Bubble Bath)
- Fine detail brush
- Top coat (e.g., Seche Vite Dry Fast Top Coat)
Instructions:
- Apply a base coat to your nails.
- Paint most nails with the deep burgundy polish.
- On the accent nails, apply the nude base polish and let it dry.
- Carefully place the gold foil flakes on the accent nails using a fine detail brush.
- Seal with a top coat to protect the design and add shine.
Save Pin
Tortoiseshell Tips
This nail design features a sophisticated tortoiseshell pattern on almond-shaped nails, giving a classic yet trendy look. The combination of warm brown and caramel tones with a glossy finish creates an elegant and timeless design, perfect for any season.
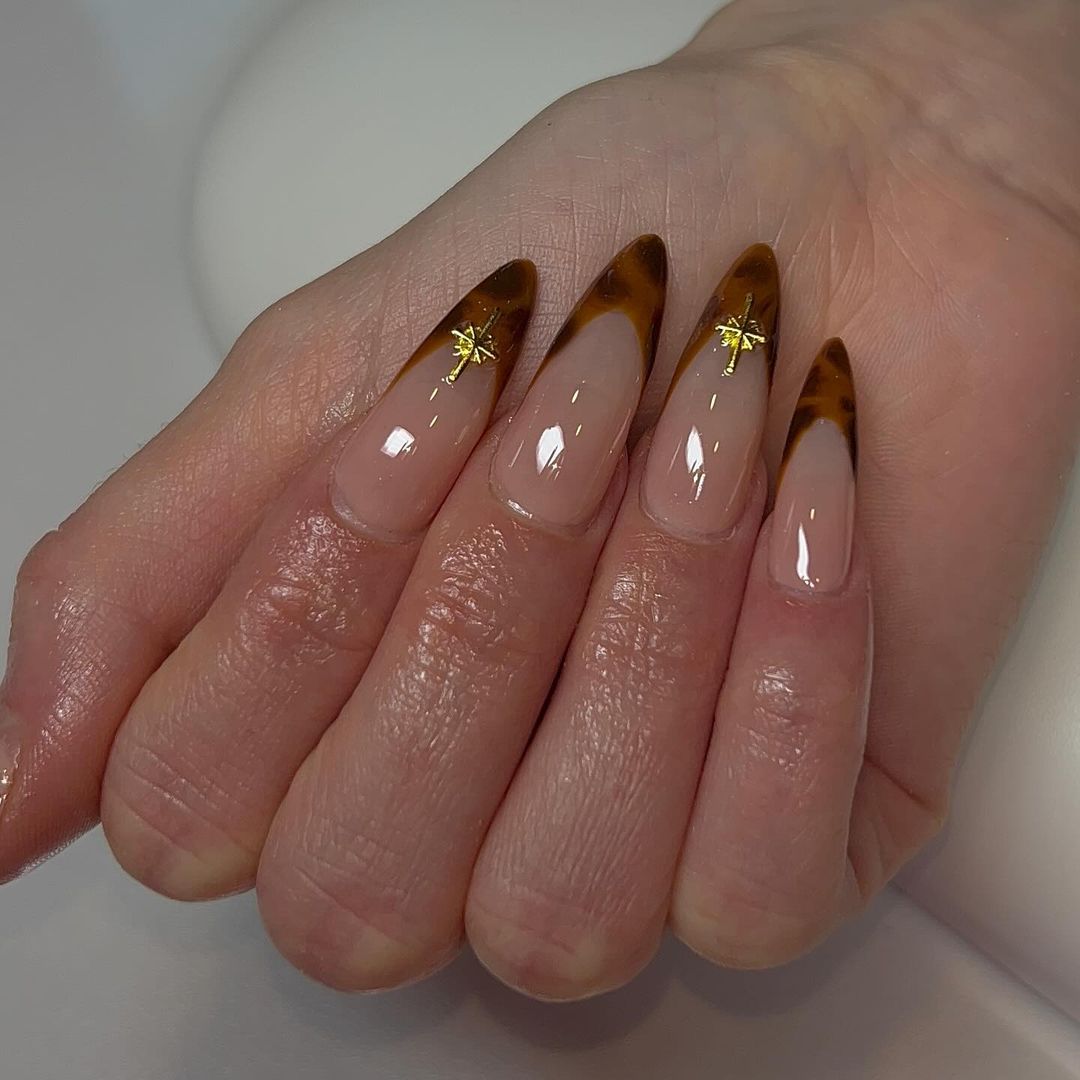
- Nude base polish (e.g., OPI Bubble Bath)
- Brown polish (e.g., Essie Partner in Crime)
- Caramel polish (e.g., OPI Going My Way or Norway?)
- Fine detail brush
- Top coat (e.g., Seche Vite Dry Fast Top Coat)
Instructions:
- Apply a base coat to your nails.
- Paint the nails with the nude base polish and let it dry.
- Using a fine detail brush, create the tortoiseshell pattern with the brown and caramel polishes.
- Seal with a top coat to protect the design and add shine.
Gothic Glamour
This bold and dramatic nail design features sleek black stiletto nails with intricate crystal accents. The combination of glossy and matte finishes, along with the sparkling crystals, creates a glamorous and edgy look, perfect for making a statement.
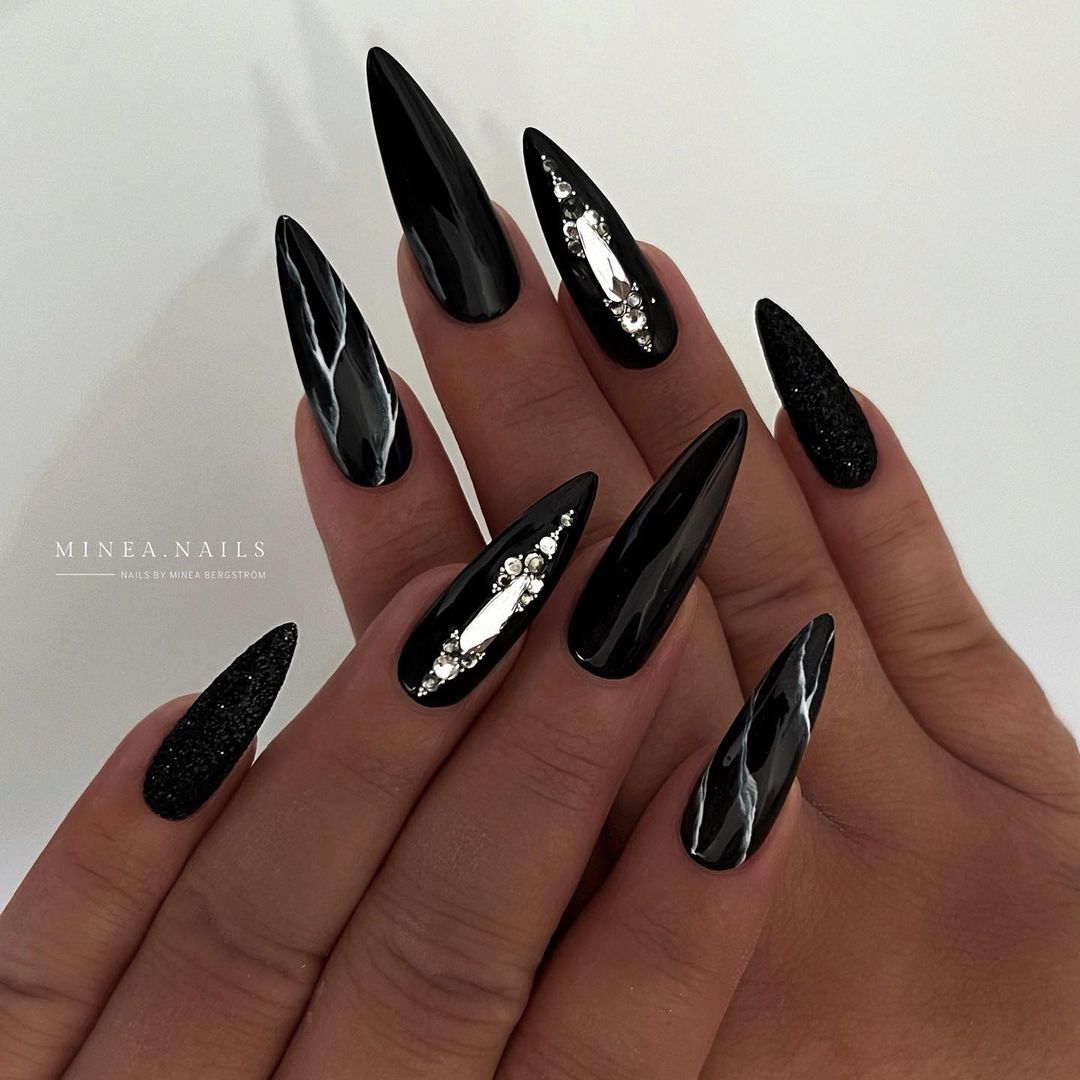
- Black polish (e.g., OPI Black Onyx)
- Matte top coat (e.g., OPI Matte Top Coat)
- Crystals or rhinestones (e.g., Swarovski Crystals)
- Nail glue (e.g., Kiss Precision Nail Glue)
- Fine detail brush
Instructions:
- Apply a base coat to your nails.
- Paint the nails with the black polish and let it dry.
- Apply the matte top coat on some nails to create a contrast.
- Using nail glue, carefully place the crystals or rhinestones on the accent nails.
- Seal with a top coat to protect the design and add shine.
Pumpkin Patch Delight
Celebrate the fall season with this adorable pumpkin-themed nail design. The combination of warm orange and gold tones with cute pumpkin and star motifs creates a fun and festive look, perfect for autumn festivities and Halloween.
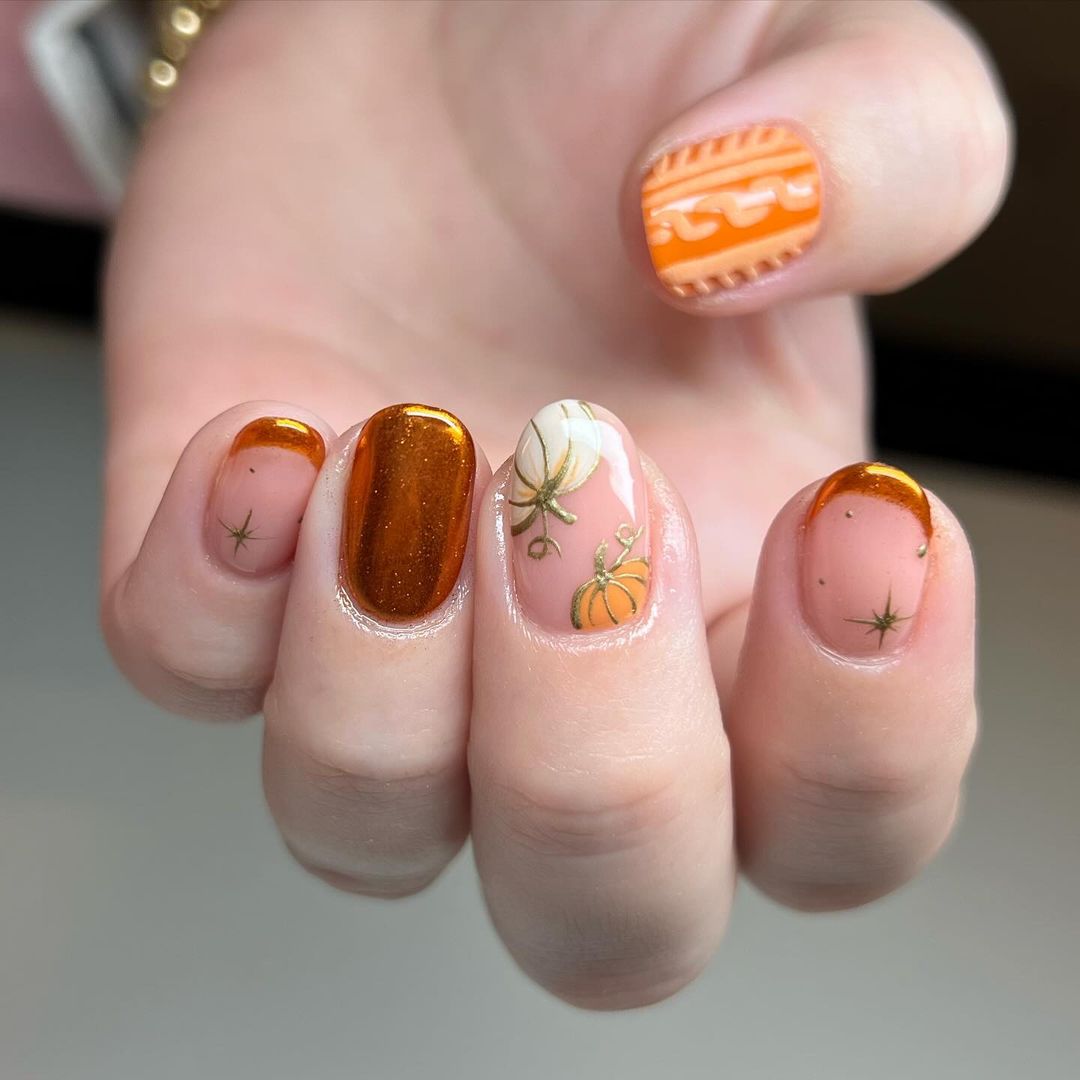
- Orange polish (e.g., Essie Fall For NYC)
- Gold polish (e.g., OPI Glitzerland)
- Nude base polish (e.g., OPI Bubble Bath)
- Fine detail brush
- Top coat (e.g., Seche Vite Dry Fast Top Coat)
Instructions:
- Apply a base coat to your nails.
- Paint most nails with the orange polish, leaving one or two nails for the pumpkin designs.
- Use the gold polish on the remaining nails.
- On the accent nails, apply the nude base polish and let it dry.
- With a fine detail brush, draw pumpkin and star motifs using the orange and gold polishes.
- Seal with a top coat to protect the design and add shine.
Stripes and Sparkles
This elegant and modern design features a combination of nude and pastel shades with intricate striped patterns and glitter accents. The long coffin-shaped nails provide a perfect canvas for the delicate lines and shimmering details, creating a sophisticated and eye-catching look suitable for any occasion.
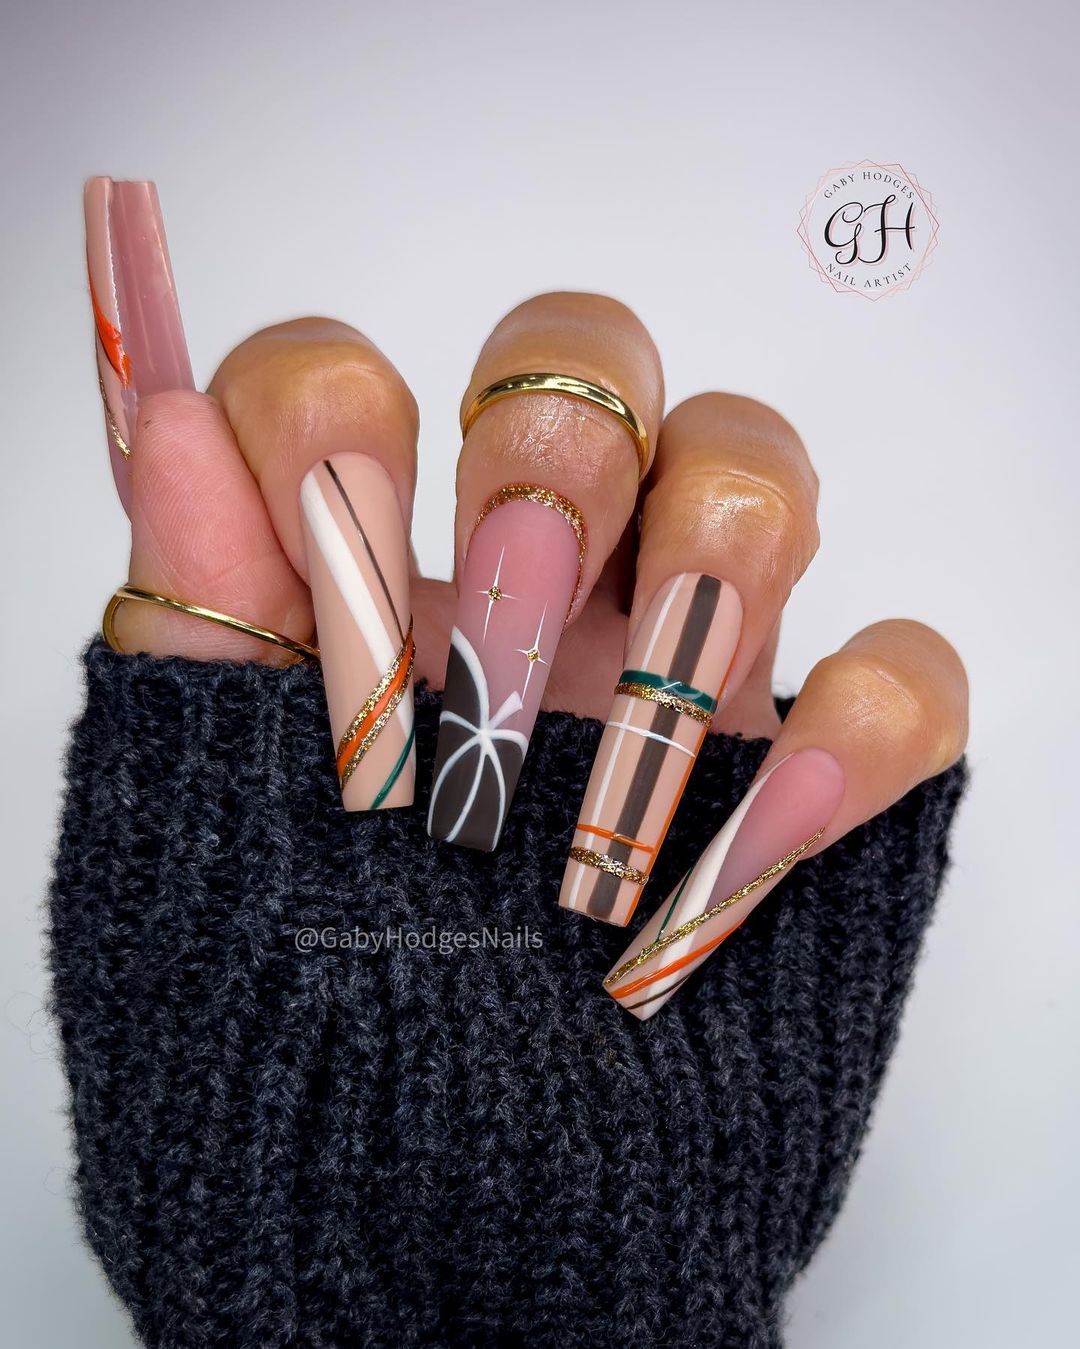
- Nude base polish (e.g., OPI Samoan Sand)
- Pastel shades (e.g., Essie Mint Candy Apple, Essie Ballet Slippers)
- Black polish for stripes (e.g., OPI Black Onyx)
- Gold glitter polish (e.g., Essie Summit of Style)
- Fine detail brush
- Striping tape
- Top coat (e.g., Seche Vite Dry Fast Top Coat)
Instructions:
- Apply a base coat to your nails.
- Paint your nails with the nude base polish and let it dry.
- Use striping tape to create clean lines, then fill in with pastel shades.
- Add black stripes using a fine detail brush.
- Apply gold glitter accents where desired.
- Finish with a top coat to seal the design and add shine.
Autumn Leaves and Amber
This vibrant fall design showcases the rich colors of the season with deep oranges and browns. The long acrylic nails are adorned with leaf motifs and amber-like marbling, creating a warm and inviting look. The holographic leaf decals add an extra touch of autumn magic, making these nails perfect for any fall gathering.
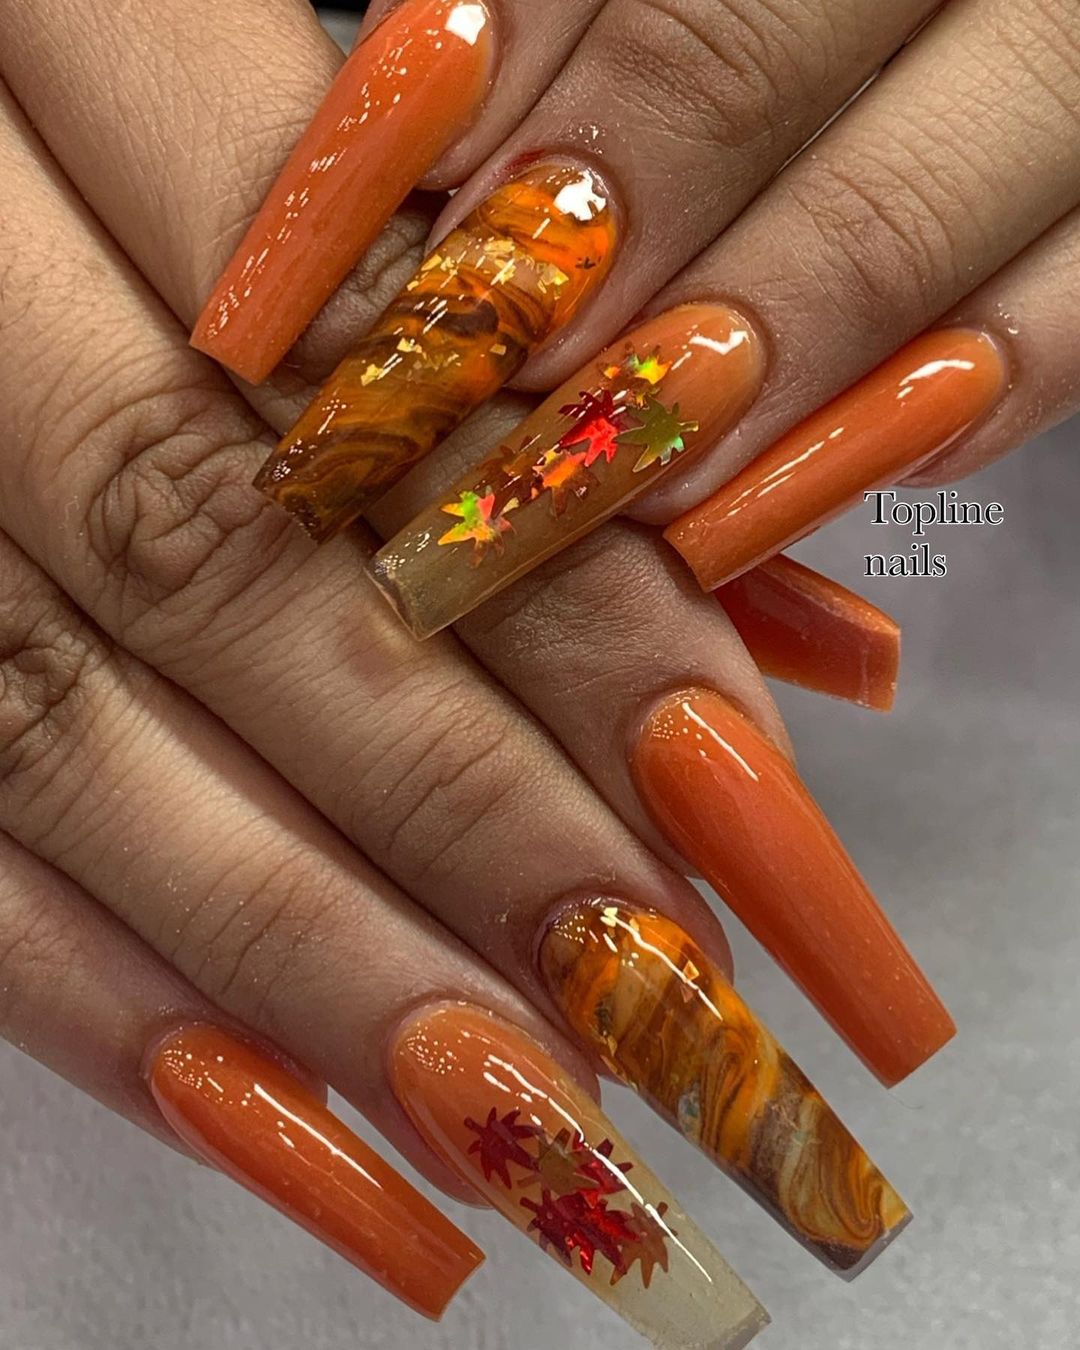
- Orange polish (e.g., OPI A Good Man-darin is Hard to Find)
- Brown polish (e.g., Essie Partner in Crime)
- Nude base polish (e.g., OPI Bubble Bath)
- Holographic leaf decals (e.g., Born Pretty Maple Leaf Decals)
- Fine detail brush
- Top coat (e.g., Seche Vite Dry Fast Top Coat)
Instructions:
- Apply a base coat to your nails.
- Paint your nails with the orange polish and let it dry.
- Create marbling effects with the brown polish using a fine detail brush.
- Apply the holographic leaf decals on accent nails.
- Finish with a top coat to seal the design and add shine.
Retro Waves
This playful design brings a touch of the ’70s with its retro wave patterns in warm fall colors. The short square nails are perfect for showcasing the bold, curvy lines in mustard yellow, deep red, and white. This fun and funky design is great for those who love a vintage vibe with a modern twist.
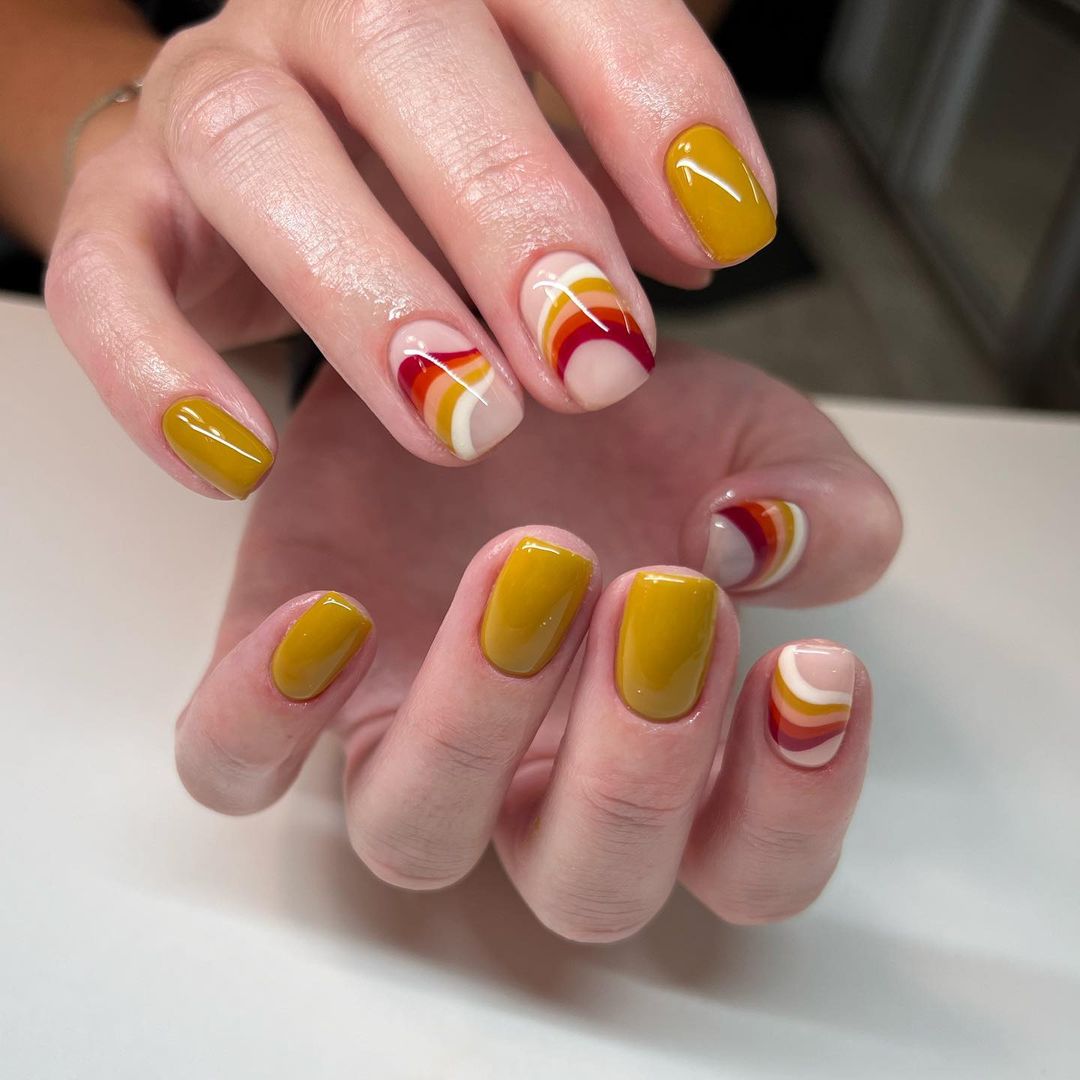
- Mustard yellow polish (e.g., OPI Sun, Sea, and Sand in My Pants)
- Deep red polish (e.g., Essie Maki Me Happy)
- White polish (e.g., Essie Blanc)
- Fine detail brush
- Top coat (e.g., Seche Vite Dry Fast Top Coat)
Instructions:
- Apply a base coat to your nails.
- Paint your nails with the mustard yellow polish and let it dry.
- Using a fine detail brush, create wave patterns with the deep red and white polishes.
- Finish with a top coat to seal the design and add shine.
Metallic Marvel
This striking design features a metallic chrome finish with rhinestone accents, giving a glamorous and futuristic look. The long square nails have a mirror-like shine, and the strategically placed rhinestones add a touch of luxury and sparkle. This design is perfect for making a bold statement at any event.
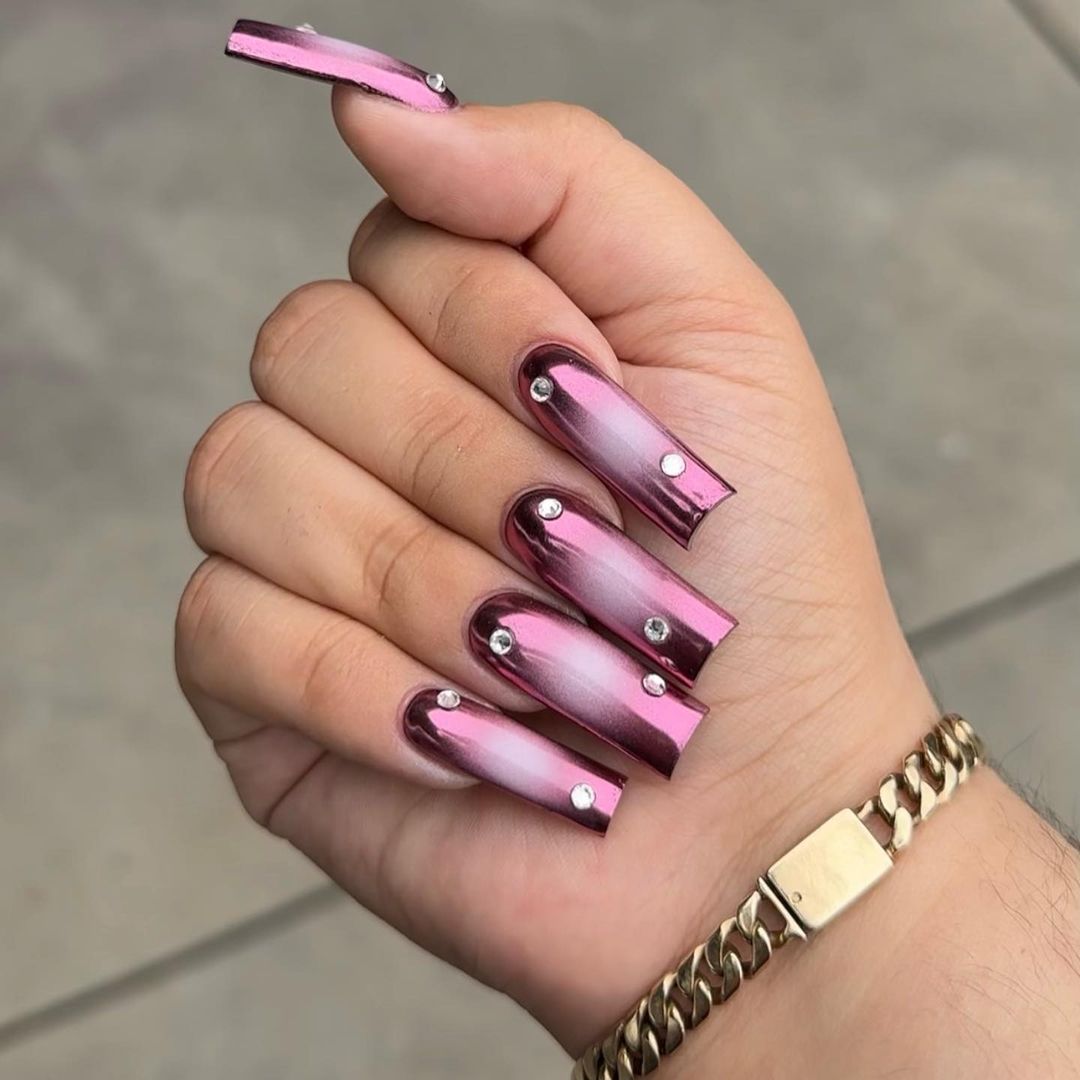
- Metallic chrome polish (e.g., Sally Hansen Color Foil in Sterling Silver)
- Rhinestones (e.g., Swarovski Crystals)
- Nail glue (e.g., Kiss Precision Nail Glue)
- Top coat (e.g., Seche Vite Dry Fast Top Coat)
Instructions:
- Apply a base coat to your nails.
- Paint your nails with the metallic chrome polish and let it dry.
- Carefully place rhinestones on the nails using nail glue.
- Finish with a top coat to secure the rhinestones and add shine.
Matte Leaf Imprints
This elegant design features matte nails in muted fall colors with delicate leaf imprints. The almond-shaped nails are painted in shades of taupe, gray, and mauve, creating a sophisticated and understated look. The 3D leaf imprints add a subtle texture, making these nails perfect for a refined autumn style.
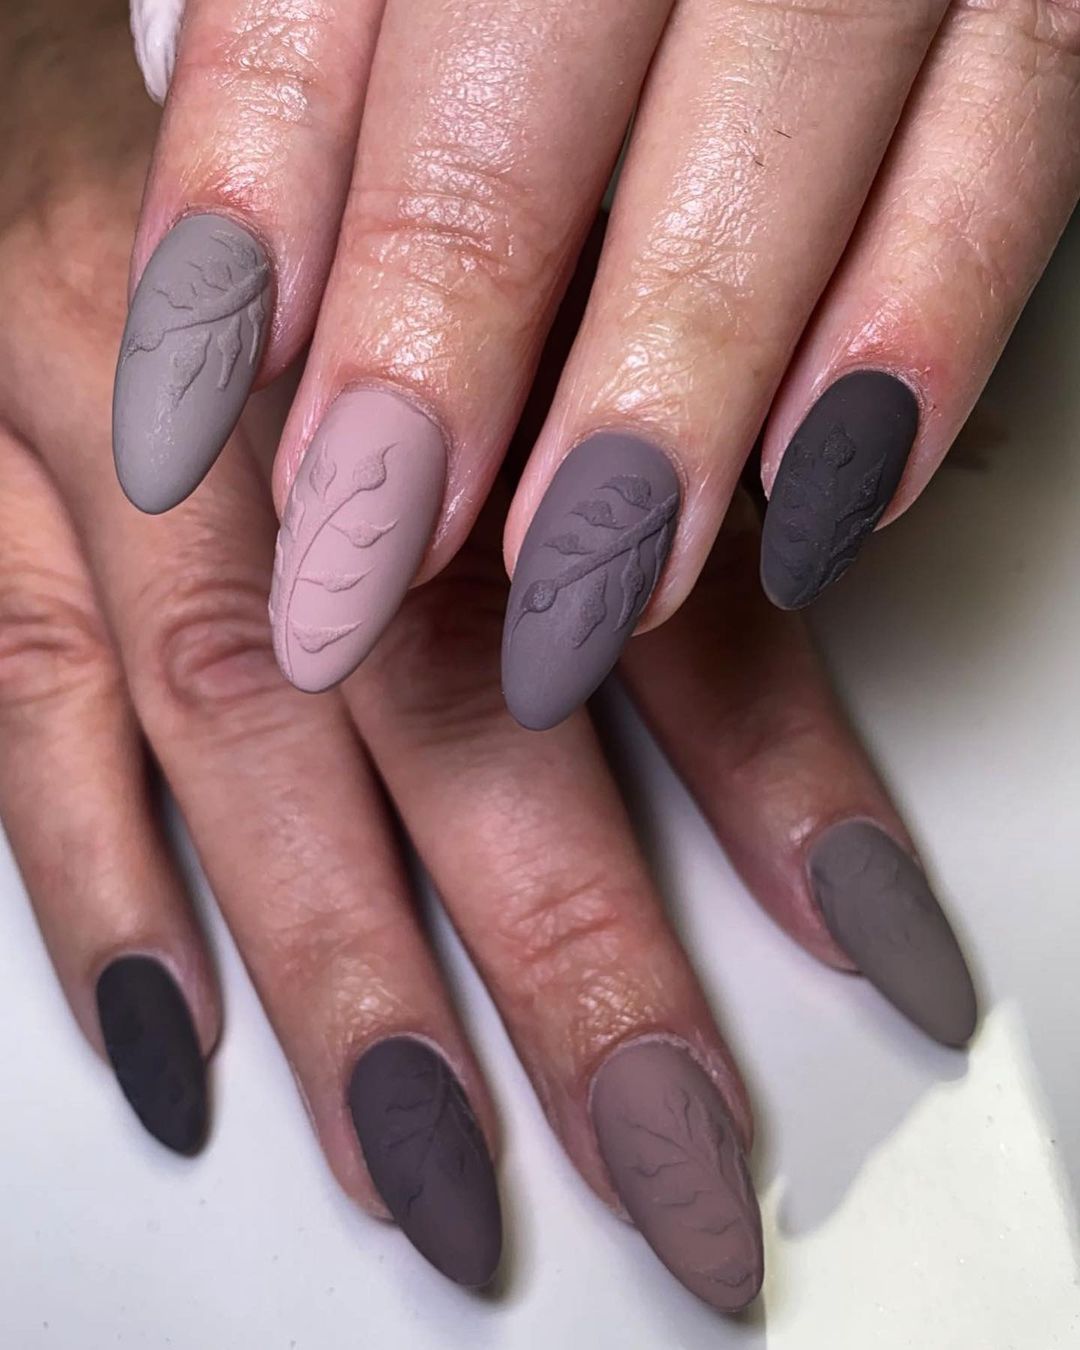
- Taupe polish (e.g., OPI Taupe-less Beach)
- Gray polish (e.g., Essie Master Plan)
- Mauve polish (e.g., OPI Do You Take Lei Away?)
- Matte top coat (e.g., OPI Matte Top Coat)
- Leaf imprint tool (e.g., silicone nail art stamper)
Instructions:
- Apply a base coat to your nails.
- Paint your nails with the taupe, gray, and mauve polishes and let them dry.
- Use the leaf imprint tool to create leaf patterns on the nails.
- Finish with a matte top coat to seal the design and add a matte finish.
Fall Confetti
Celebrate the vibrant colors of fall with this fun and festive nail design. The long coffin-shaped nails are filled with glittering confetti in shades of yellow, orange, and brown. The transparent base allows the confetti to shine through, creating a playful and eye-catching look perfect for the season.
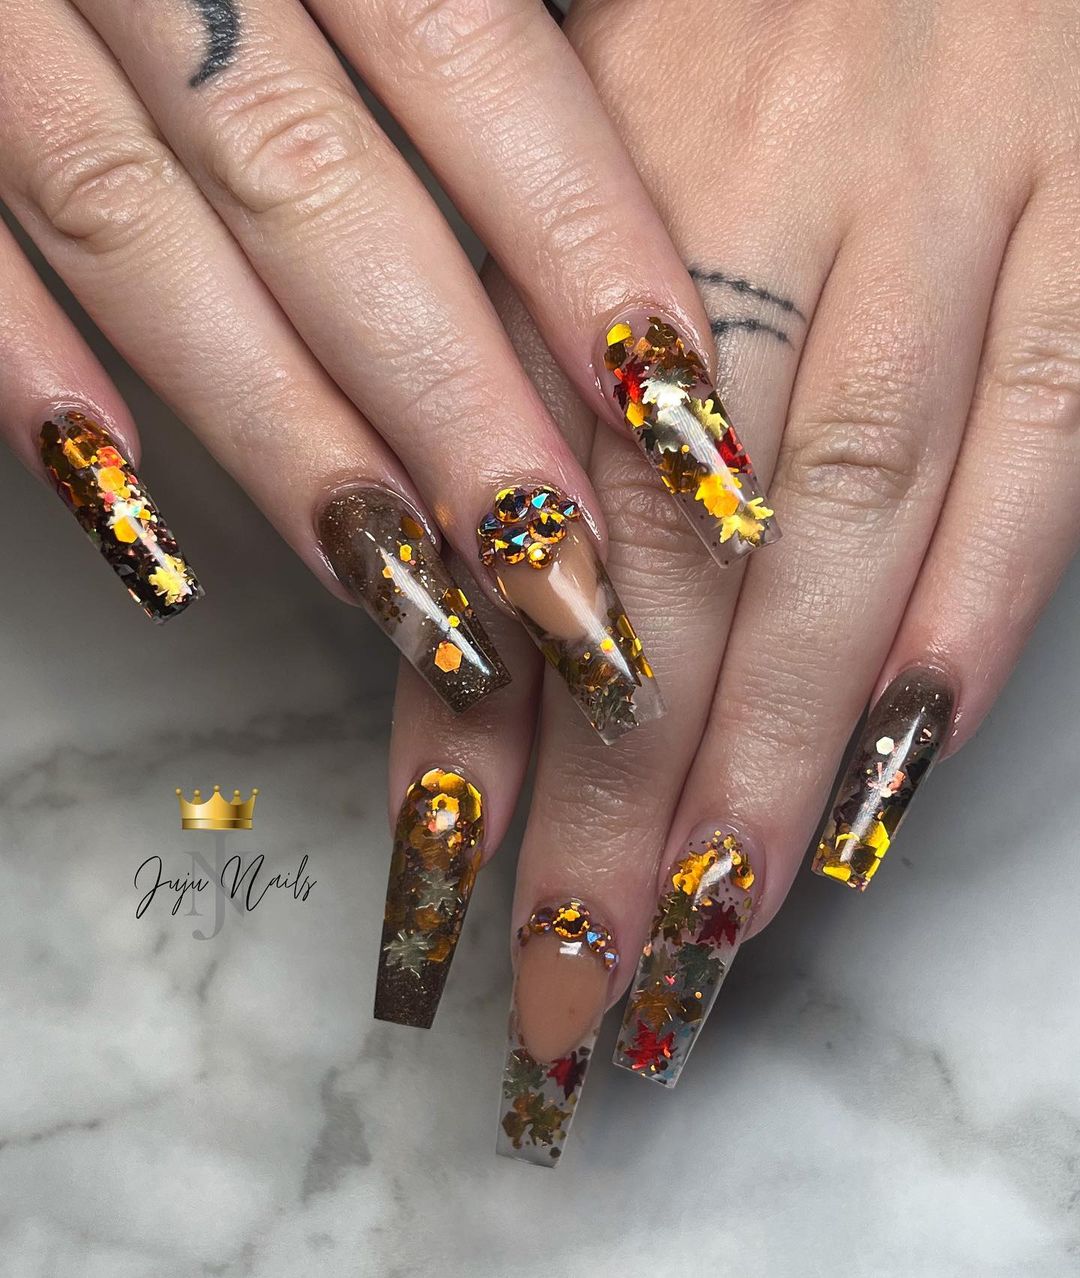
- Clear base polish (e.g., OPI Top Coat)
- Fall-themed glitter confetti (e.g., Born Pretty Fall Leaves Glitter)
- Top coat (e.g., Seche Vite Dry Fast Top Coat)
Instructions:
- Apply a base coat to your nails.
- While the base coat is still tacky, sprinkle the fall-themed glitter confetti onto the nails.
- Gently press the confetti to ensure it sticks.
- Finish with a top coat to seal the design and add shine.
Autumnal Glitter Ombre
This stunning nail design combines rich burgundy and glittering gold with delicate leaf accents, capturing the vibrant colors of fall. The long coffin-shaped nails feature a sophisticated gradient from burgundy to gold, with a clear base adorned with autumn leaves, creating a luxurious and festive look perfect for the season.
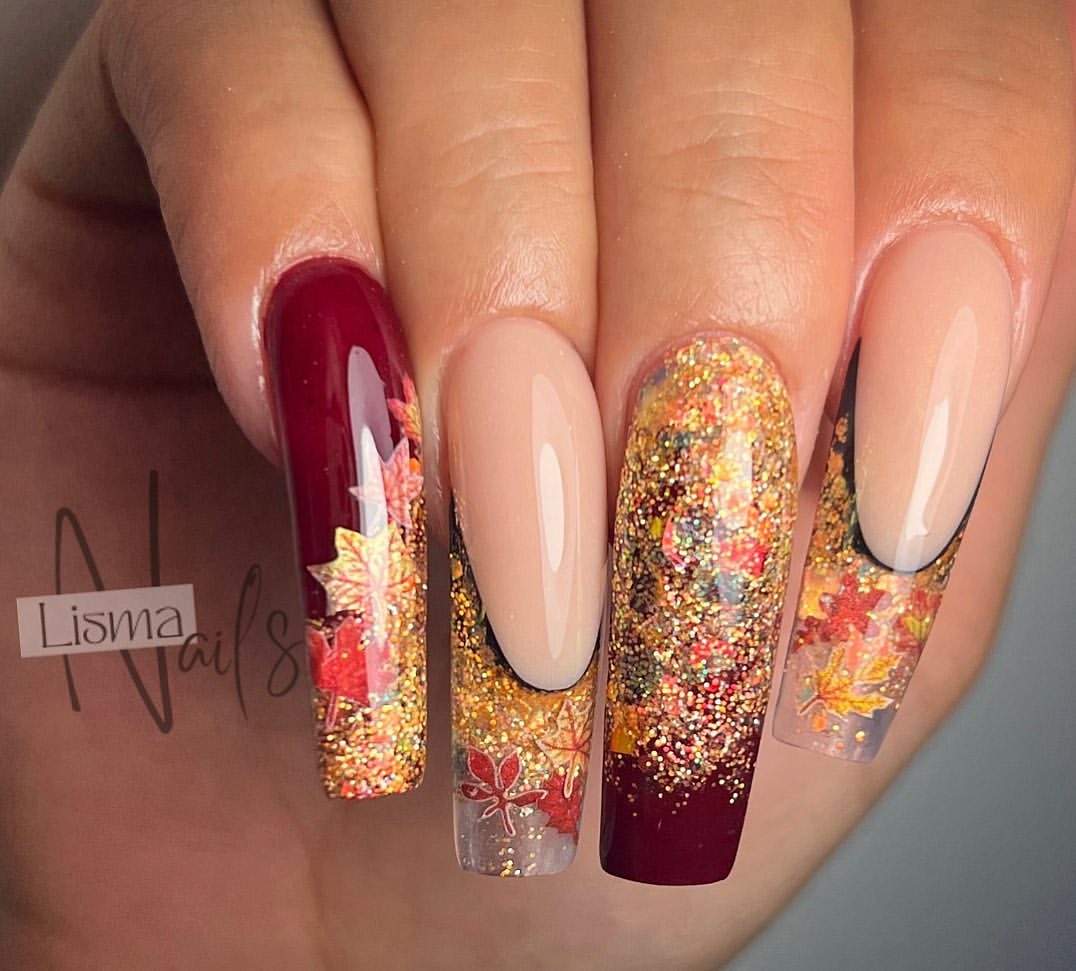
- Burgundy polish (e.g., Essie Bordeaux)
- Gold glitter polish (e.g., China Glaze Fairy Dust)
- Clear base polish (e.g., OPI Top Coat)
- Autumn leaf decals (e.g., Born Pretty Maple Leaf Stickers)
- Fine detail brush
- Top coat (e.g., Seche Vite Dry Fast Top Coat)
Instructions:
- Apply a base coat to your nails.
- Paint the nails with the burgundy polish, leaving some space for the gradient effect.
- Gradually add the gold glitter polish from the tips towards the middle to create an ombre effect.
- Apply the autumn leaf decals on the clear base area.
- Finish with a top coat to seal the design and add shine.
Chocolate Delight
This elegant nail design features a rich chocolate brown shade with nude accents and a touch of sparkle. The long coffin-shaped nails are painted in a glossy brown polish with a negative space design, highlighted by a rhinestone bow on one nail, adding a sophisticated and chic touch to the manicure.
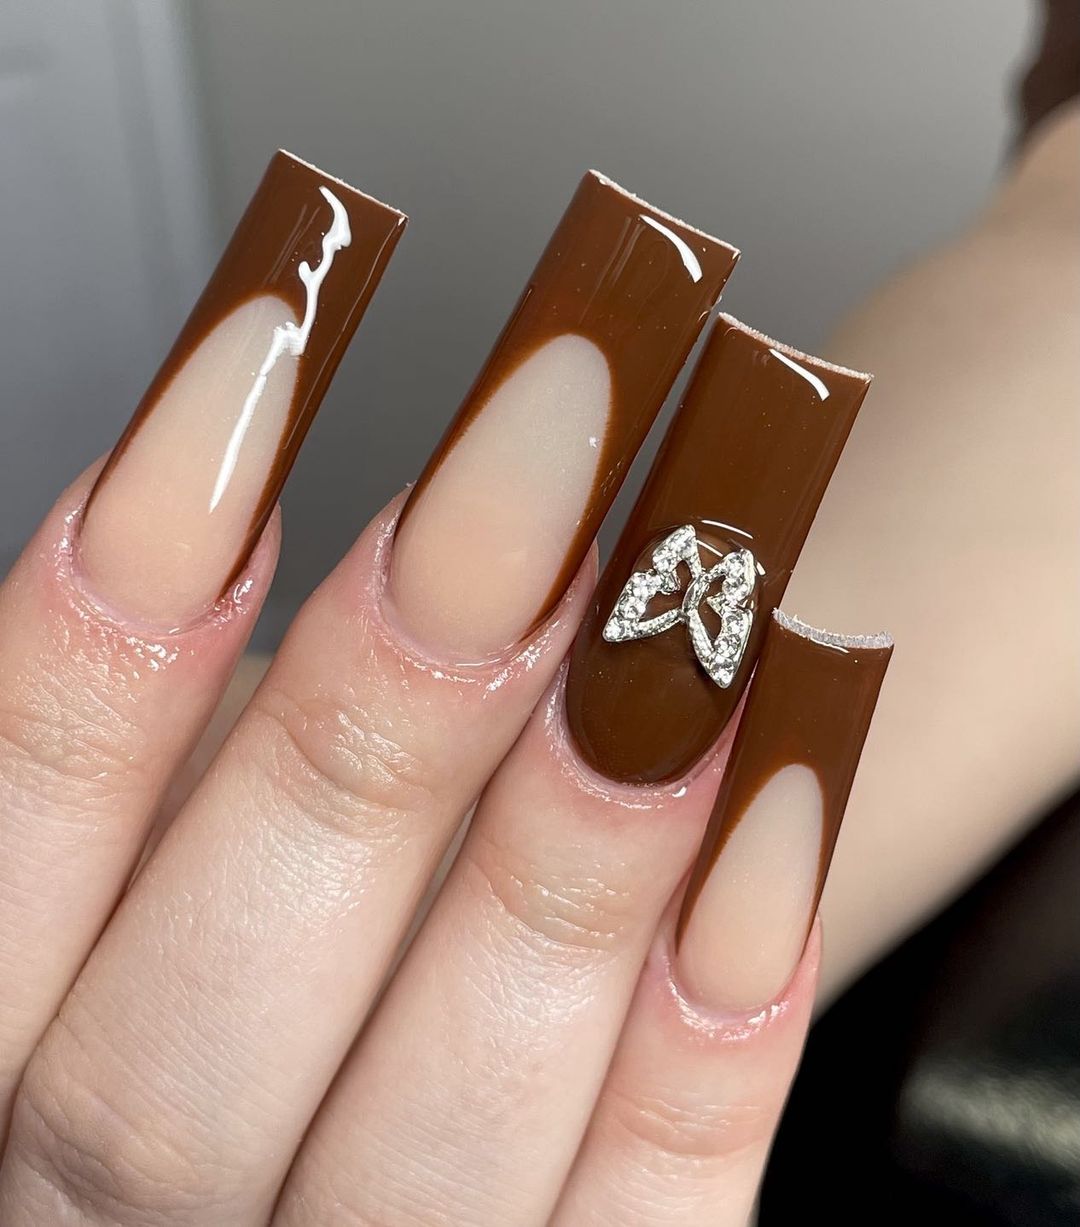
- Chocolate brown polish (e.g., OPI Chocolate Moose)
- Nude base polish (e.g., OPI Bubble Bath)
- Rhinestone bow (e.g., Swarovski Crystal Bow)
- Nail glue (e.g., Kiss Precision Nail Glue)
- Top coat (e.g., Seche Vite Dry Fast Top Coat)
Instructions:
- Apply a base coat to your nails.
- Paint the nails with the chocolate brown polish, leaving a negative space design.
- Apply the nude base polish in the negative space areas.
- Use nail glue to attach the rhinestone bow on the accent nail.
- Finish with a top coat to seal the design and add shine.
Gold and Black Elegance
This luxurious nail design features a combination of matte black and metallic gold, creating a striking contrast. The almond-shaped nails are adorned with curvy, wave-like patterns, adding a touch of sophistication and glamour. This design is perfect for making a bold statement during the fall season.
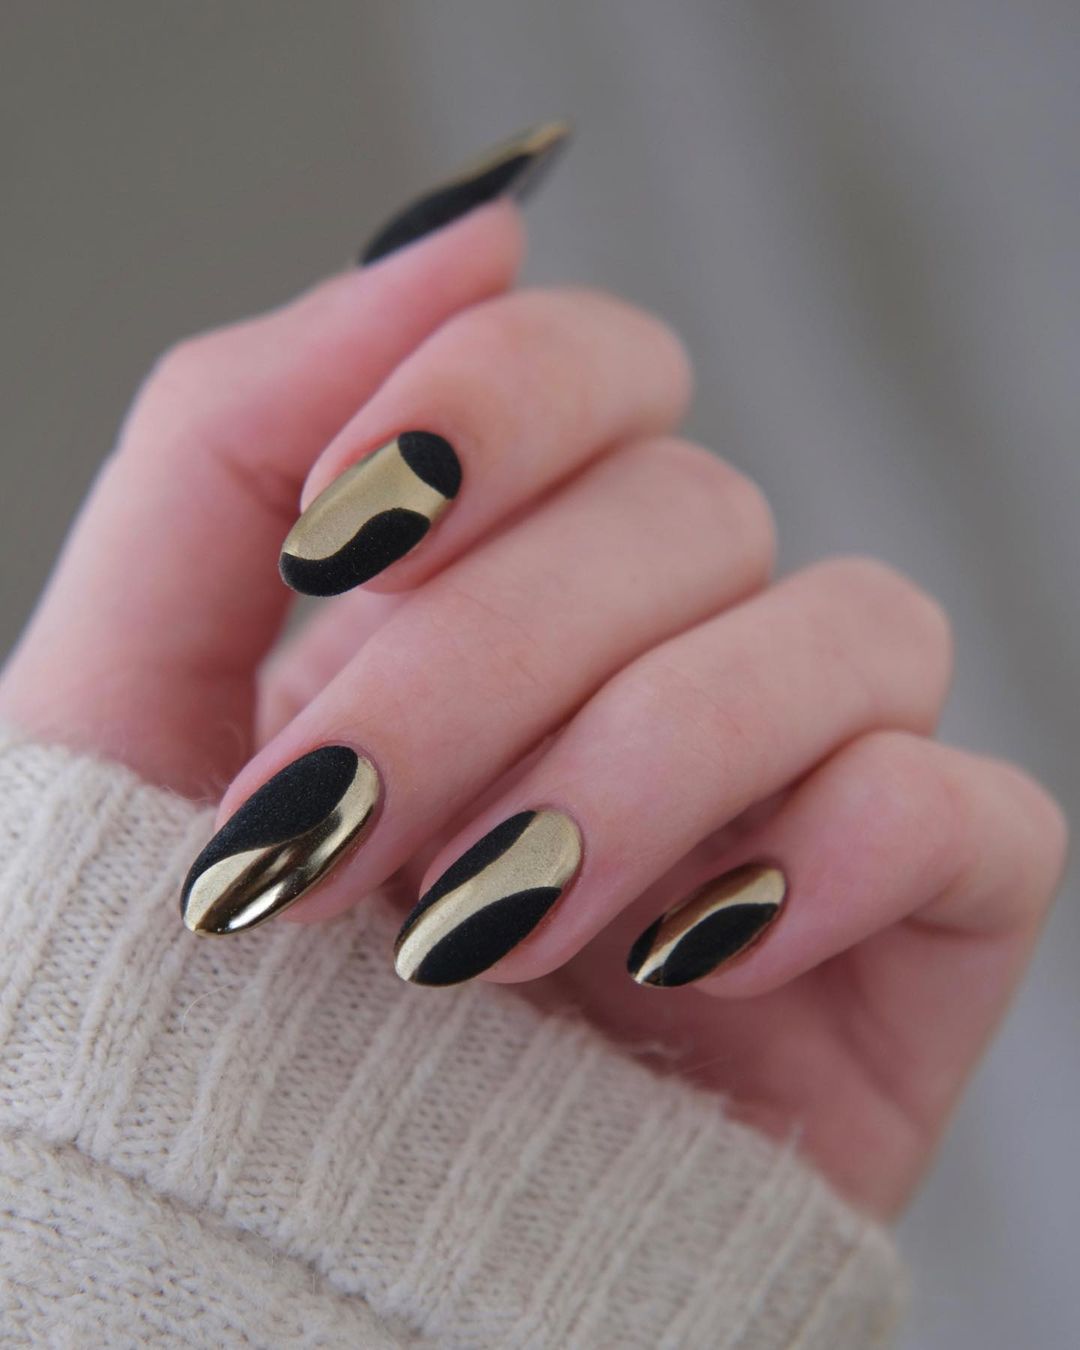
- Matte black polish (e.g., OPI Black Onyx with Matte Top Coat)
- Metallic gold polish (e.g., Essie Good as Gold)
- Fine detail brush
- Top coat (e.g., Seche Vite Dry Fast Top Coat)
Instructions:
- Apply a base coat to your nails.
- Paint the nails with the matte black polish and let it dry.
- Using a fine detail brush, create wave-like patterns with the metallic gold polish.
- Finish with a top coat to seal the design and add shine.
Glittering Autumn Leaves
This fall-inspired nail design showcases the beauty of autumn leaves with glitter and rhinestones. The long coffin-shaped nails feature a combination of brown and nude polishes, accented with glittering leaves and rhinestones, creating a festive and elegant look perfect for the fall season.
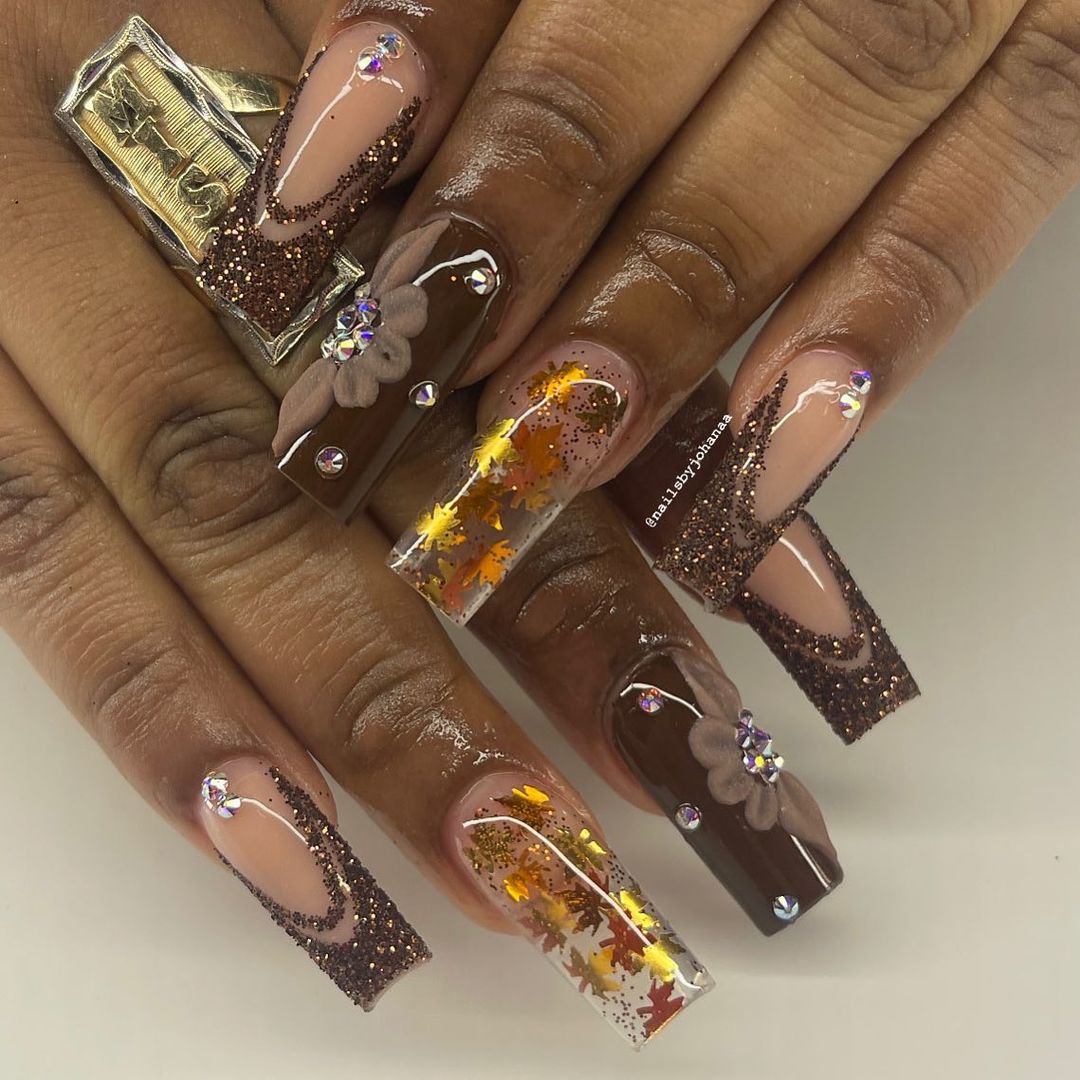
- Brown polish (e.g., Essie Partner in Crime)
- Nude base polish (e.g., OPI Bubble Bath)
- Gold glitter polish (e.g., Essie Summit of Style)
- Rhinestones (e.g., Swarovski Crystals)
- Autumn leaf decals (e.g., Born Pretty Maple Leaf Stickers)
- Nail glue (e.g., Kiss Precision Nail Glue)
- Top coat (e.g., Seche Vite Dry Fast Top Coat)
Instructions:
- Apply a base coat to your nails.
- Paint the nails with the brown polish, leaving some space for the nude base.
- Apply the nude base polish in the clear areas and let it dry.
- Add gold glitter polish and autumn leaf decals for a festive touch.
- Use nail glue to attach rhinestones on the accent nails.
- Finish with a top coat to seal the design and add shine.
Glitter Gradient with Leaf Accents
This beautiful nail design combines the warmth of autumn colors with glitter and leaf accents. The long coffin-shaped nails are painted in a gradient from nude to brown, adorned with glitter and colorful leaves, creating a vibrant and festive look perfect for fall celebrations.
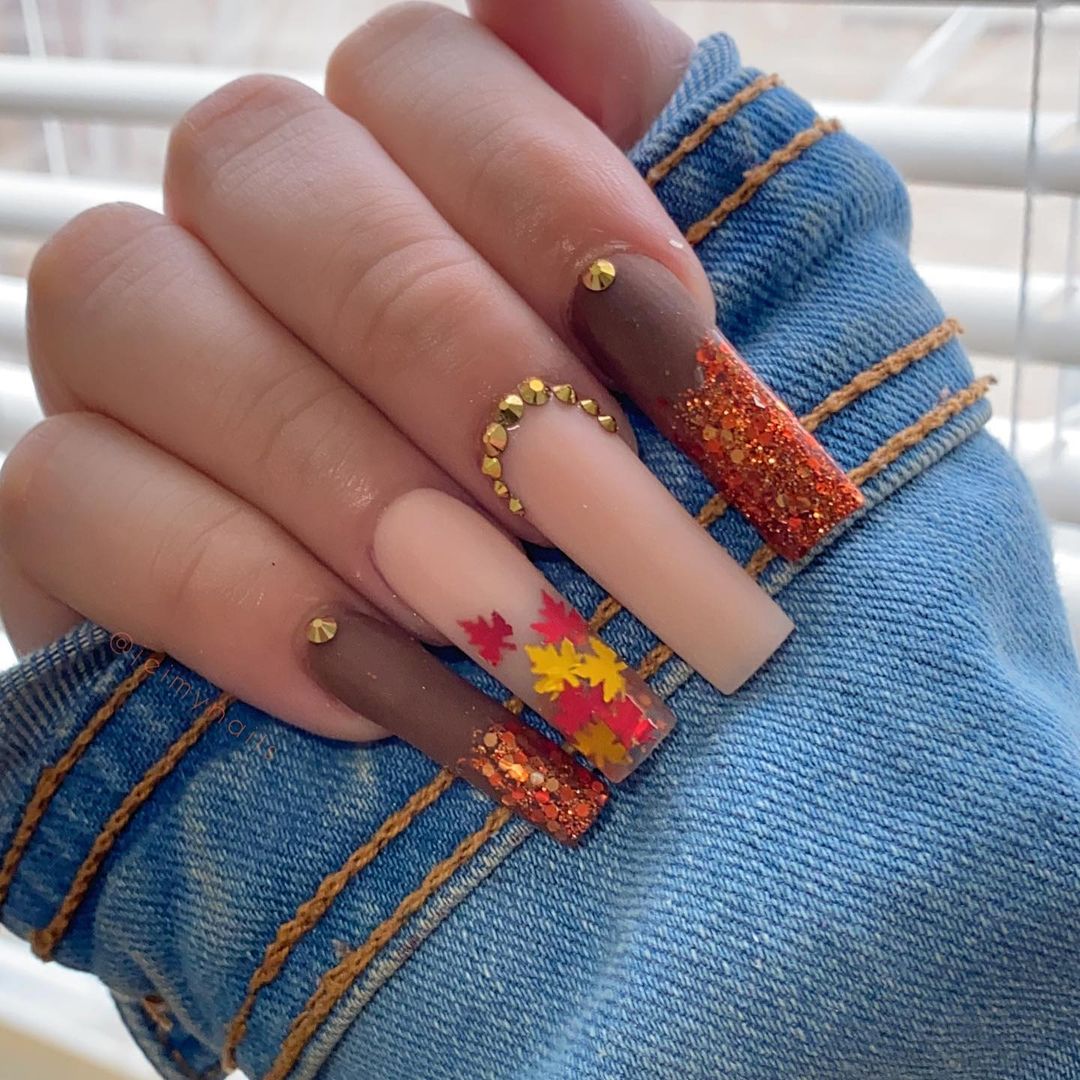
- Brown polish (e.g., OPI Chocolate Moose)
- Nude base polish (e.g., OPI Bubble Bath)
- Gold glitter polish (e.g., China Glaze Fairy Dust)
- Autumn leaf decals (e.g., Born Pretty Maple Leaf Stickers)
- Fine detail brush
- Top coat (e.g., Seche Vite Dry Fast Top Coat)
Instructions:
- Apply a base coat to your nails.
- Paint the nails with the nude base polish and let it dry.
- Create a gradient effect by adding brown polish from the tips towards the middle.
- Apply gold glitter polish and autumn leaf decals for a festive touch.
- Finish with a top coat to seal the design and add shine.
Swirls of Gold
This sophisticated nail design features intricate gold swirls on a nude base, creating an elegant and artistic look. The almond-shaped nails are perfect for showcasing the delicate gold patterns, making this design ideal for those who love a touch of luxury and creativity in their manicure.
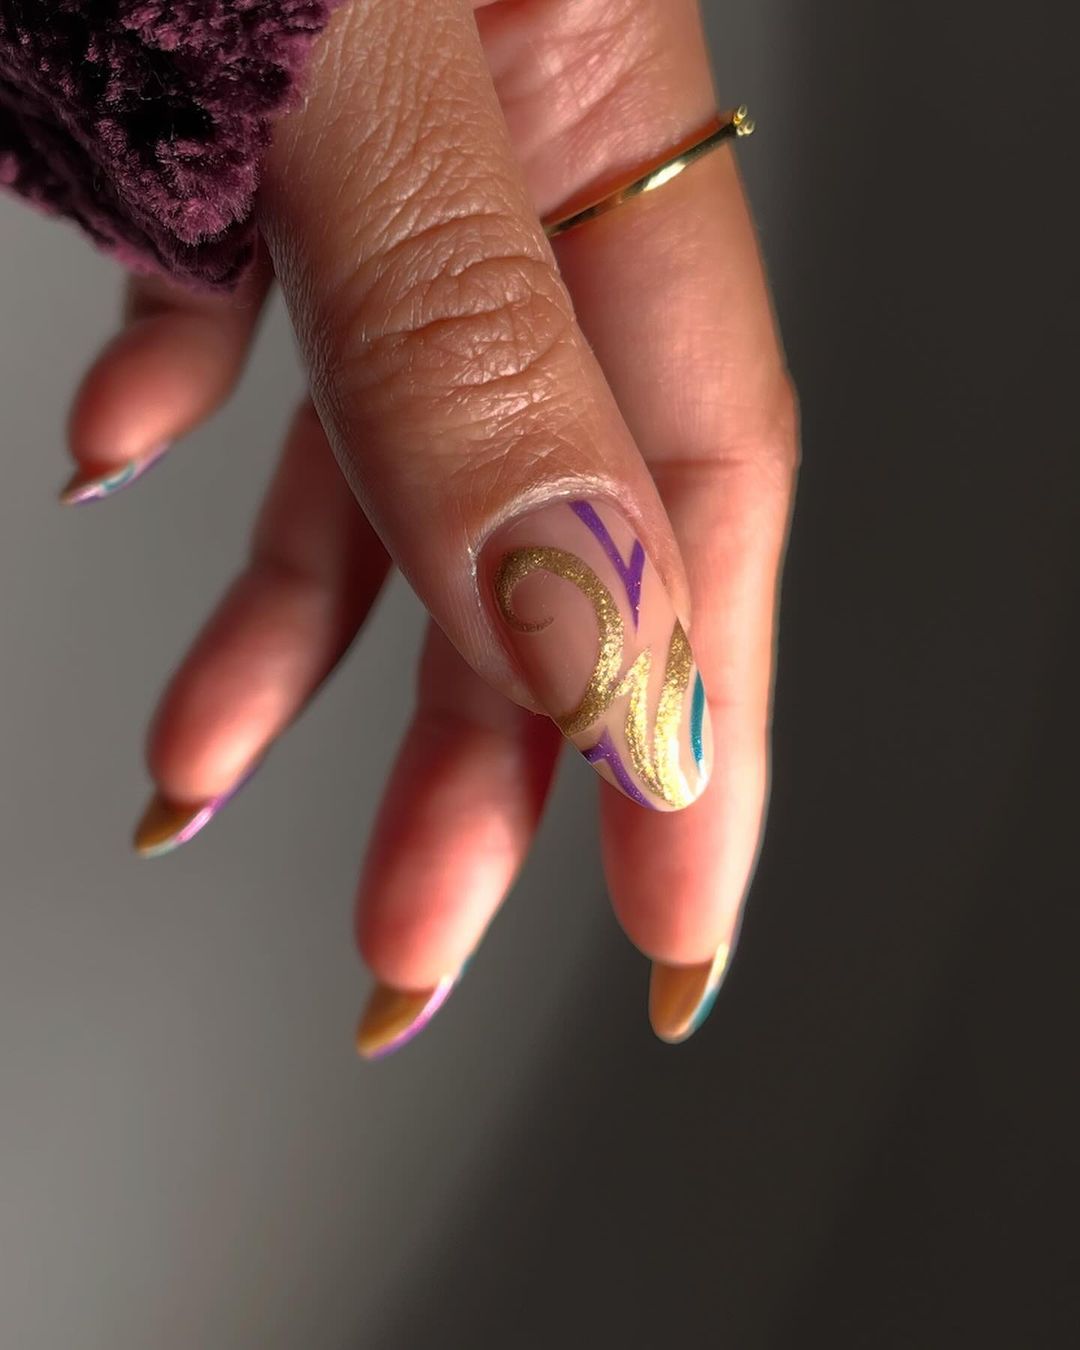
- Nude base polish (e.g., OPI Bubble Bath)
- Gold polish (e.g., Essie Good as Gold)
- Fine detail brush
- Top coat (e.g., Seche Vite Dry Fast Top Coat)
Instructions:
- Apply a base coat to your nails.
- Paint the nails with the nude base polish and let it dry.
- Using a fine detail brush, create intricate gold swirls on the nails.
- Finish with a top coat to seal the design and add shine.
Matte Earth Tones
This stunning manicure features a variety of earthy matte shades, creating a sophisticated and understated look. The long coffin-shaped nails are painted in different hues of brown, from deep chocolate to light beige, offering a chic and versatile style perfect for fall.
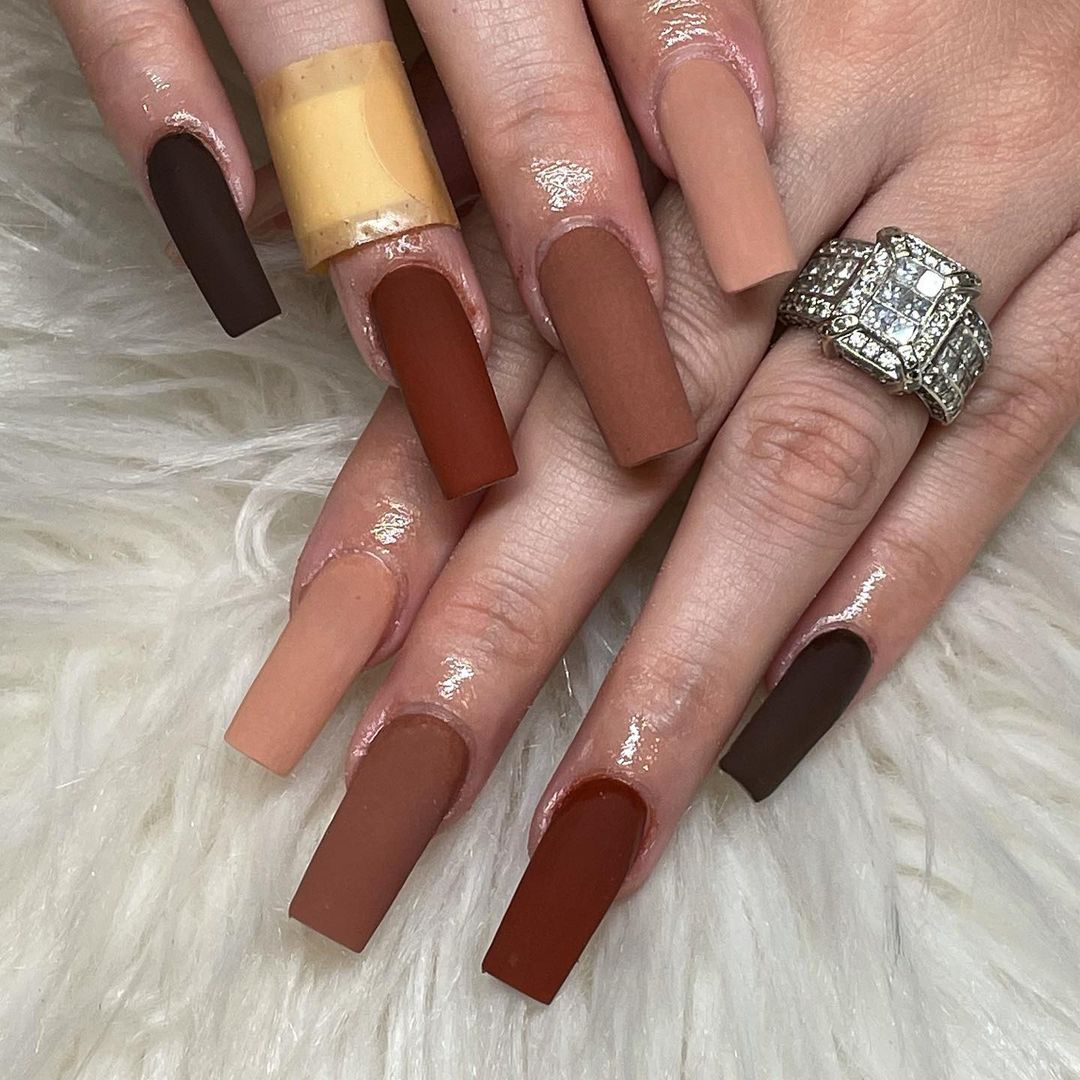
- Dark brown polish (e.g., OPI Suzi Loves Cowboys)
- Medium brown polish (e.g., Essie Take it Outside)
- Rust polish (e.g., Essie Playing Koi)
- Light beige polish (e.g., OPI Samoan Sand)
- Matte top coat (e.g., OPI Matte Top Coat)
Instructions:
- Apply a base coat to your nails.
- Paint each nail with a different shade of brown, creating a gradient effect.
- Apply a matte top coat to achieve the matte finish.
- Let the nails dry completely to set the matte look.
Fall Leaves and Glitter
Celebrate the vibrant colors of autumn with this festive nail design. The long coffin-shaped nails are adorned with holographic leaf decals and glitter, creating a sparkling and colorful look. The nude base enhances the vibrant fall-themed decorations, making this manicure perfect for the season.
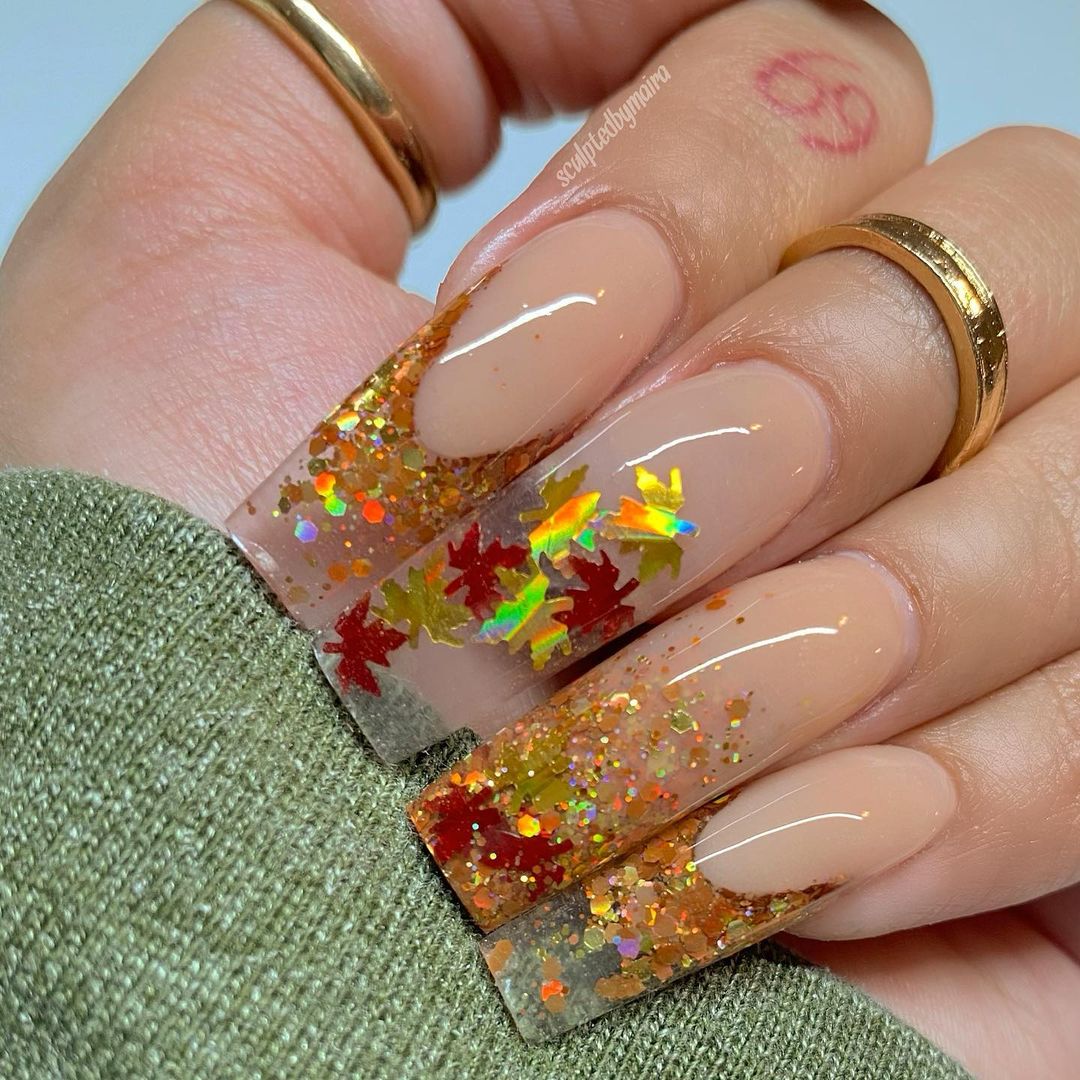
- Nude base polish (e.g., OPI Bubble Bath)
- Gold glitter polish (e.g., China Glaze Fairy Dust)
- Holographic leaf decals (e.g., Born Pretty Maple Leaf Stickers)
- Fine detail brush
- Top coat (e.g., Seche Vite Dry Fast Top Coat)
Instructions:
- Apply a base coat to your nails.
- Paint the nails with the nude base polish and let it dry.
- Apply the gold glitter polish on the tips and blend towards the middle.
- Place the holographic leaf decals on the clear base area.
- Finish with a top coat to seal the design and add shine.
Tortoiseshell Tips
This sophisticated design features tortoiseshell tips on a nude base, creating a trendy and elegant look. The long square-shaped nails are accented with a gold stud at the base of the tortoiseshell design, adding a touch of luxury and style to this classic pattern.
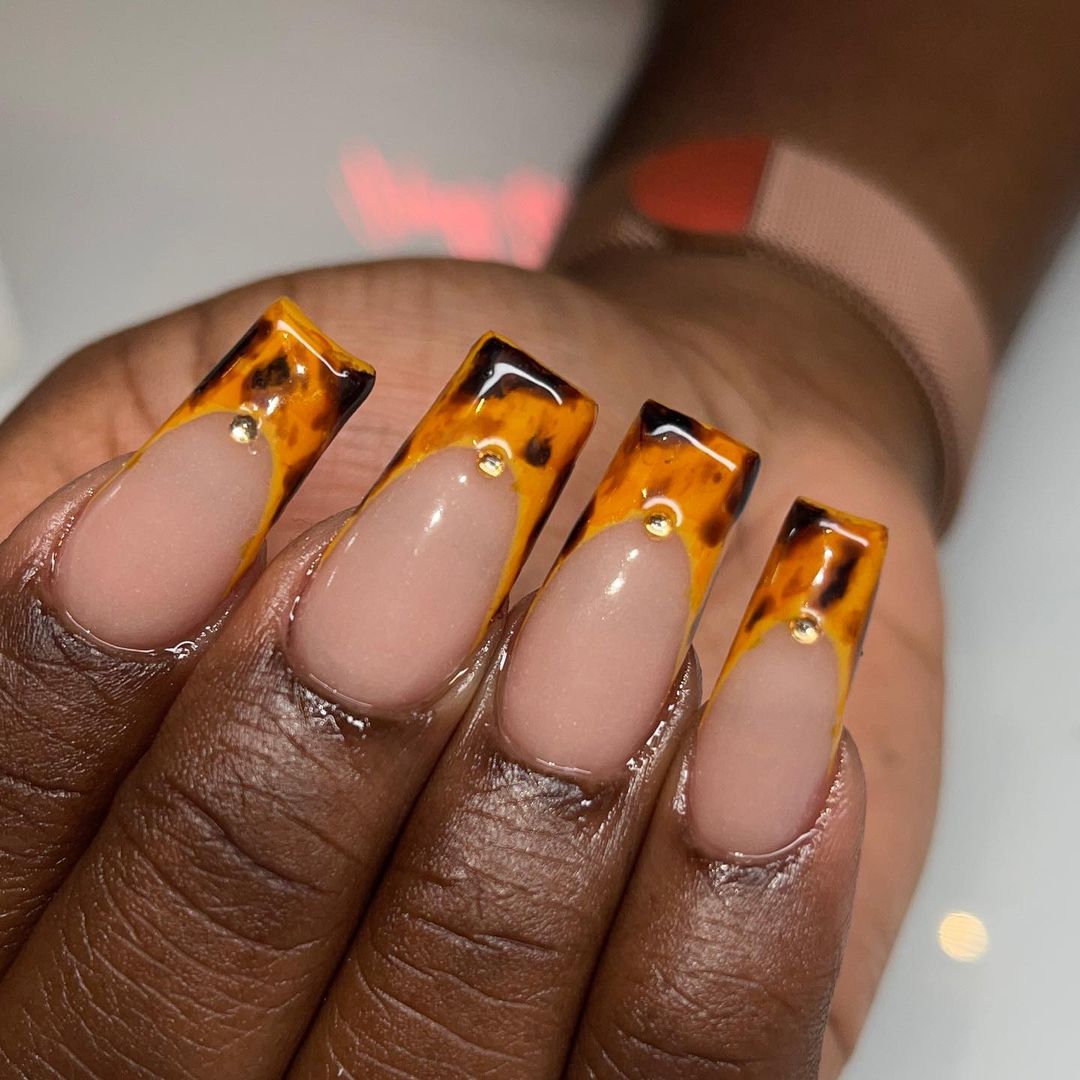
- Nude base polish (e.g., OPI Bubble Bath)
- Brown polish (e.g., Essie Partner in Crime)
- Caramel polish (e.g., OPI Going My Way or Norway?)
- Gold studs (e.g., Born Pretty Gold Studs)
- Fine detail brush
- Top coat (e.g., Seche Vite Dry Fast Top Coat)
Instructions:
- Apply a base coat to your nails.
- Paint the nails with the nude base polish and let it dry.
- Create the tortoiseshell pattern on the tips using brown and caramel polishes with a fine detail brush.
- Place a gold stud at the base of each tortoiseshell design.
- Finish with a top coat to seal the design and add shine.
FAQs
Q: How can I make my nail designs last longer? A: Always start with a base coat and finish with a top coat. Avoid using your nails as tools and wear gloves when doing household chores to protect your manicure.
Q: What are some tips for doing intricate nail art at home? A: Use fine detail brushes and practice on a plastic surface before applying designs to your nails. Invest in quality polishes and tools for the best results.
Q: How often should I change my nail designs? A: It’s best to change your nail designs every two weeks to keep your nails healthy and prevent damage.
By following these tips and using the detailed instructions provided, you can create beautiful fall-themed nails that will make a statement all season long. Happy painting!
Save Pin
